Box User Guide
Box user accounts can be accessed in two ways, where the user can access every account on an enterprise level included within the database or can access a specific account. In the first case, any user account can be accessed, and different operations can be performed. With access to a specific account, the user can still perform all the search operations like copy, retention, etc., but only on the accessible account.
This guide walks you through creating a search plan, executing it, and viewing the results within box systems.
Roles and Permissions
Roles and Permissions related to box can be segregated into 2 types -- the agent and the users. Likewise, the users would need different permissions to create and navigate around different search plans.
- Agent Permissions
You are first required to set up the agent permissions for the agent to run through different box accounts and execute the search plans. Possible permissions for the agent are --
Read
Write
Read permission lets the Agent perform the following operations:
Retrieving information from different files: Read permission lets the Box Agent access and retrieve information about files stored within Box, including the metadata and its properties.
Building Metadata: The Box Agent can gather data and information necessary for building metadata, like the file names, dates, and other relevant details with Read permission.
File Search: The Box Agent can perform searches within Box to locate specific files based on various criteria.
Write permission can be used to perform the following operations:
Copy: The Box Agent can create copies of files along with the parent folder using Write permission.
Copy Flat: The Box Agent can perform a flat copy operation, creating copies of files without retaining the folder hierarchy.
Applying metadata templates: the Agent can apply existing metadata templates to the files for retention.
Deleting expired files based on retention metadata template: Box Agent can delete files that have reached their expiration date as per the template applied on them.
If the Box Agent does not have the necessary permissions to create metadata templates directly in Box Agent, you should follow these steps to create metadata templates using the Box Admin Console:
Log in to the Box Admin Console using your assigned admin or co-admin account credentials.
Navigate to the \"Content & Sharing\" or \"Content\" section in the admin console.
Under the Content Management Settings, locate the \"Metadata\" or \"Metadata Templates\" tab.
Click on the \"Create New Template\".
Enter 'Retention Template' in the name dialog box.
Note: The template name should be Retention Template only and cannot have any other name, as it reflects the information related to the retention.
- Now, enter the following metadata details --
Retention Code -- this information is used to identify the retention category. Enter the input in text format.
Retention Description -- this field can be used to provide additional information about the retention category in text format.
Retention Period -- this is another text field used to specify the duration of the retention.
Expiry Date -- this field specifies the expiration date of the retention. Only dates are accepted as inputs to this field.
- Define all the essential fields and save the metadata template.
The created metadata template will now be available for applying and associating with relevant files or folders within Box Agent.
- User Permissions
Box Users would also need different permissions for navigating around their box accounts and creating different search plans. They are --
View Search Plans -- this permission lets the users view different search plans and their results.
Export Search Plans -- this permission lets the users export search plans.
Manage Search Plan -- the users would need this permission for creating and editing search plans.
Manage Agent Settings -- through this permission, the users can alter some of the Box Agent settings based on how they want the search plans to execute.
Box User Roles
The permissions mentioned above aren't the same for every user with a Box account. They are specific and segregated based on different roles a user can have. The Roles for Box are --
Defensive Deletion User -- the user assigned to this role gets permissions for View Search Plans, and Export Search Plans. These users cannot create or manage any search plan and cannot alter the Agent Settings either.
Defensive Deletion Admin -- the admin user has the permission to everything, i.e., View Search Plans, Export Search Plans, Manage Search Plan, Manage Agent Settings.
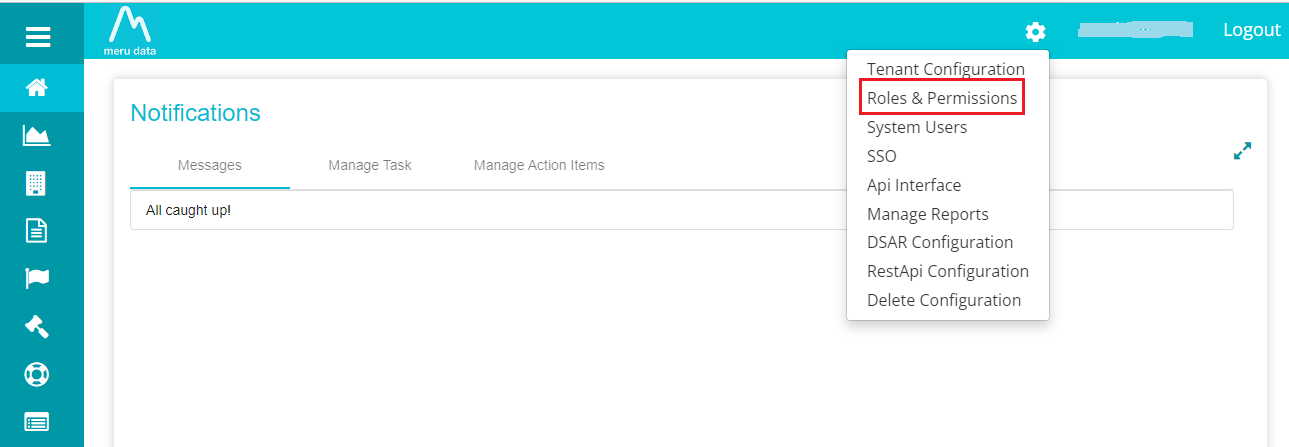
For viewing the roles and permissions allotted to the box agent and users,
- Log into Data Governance Tool.
Click on
 icon to open the 'Settings' menu.
Select 'Roles & Permissions' from the menu.
Note: Defensible_Deletion_Administrator and Defensible_Deletion_User are the two roles possible for Box accounts. The user would need any of these roles to operate on Box accounts. You can see the roles and assigned permissions for each role on the screen in the following way.

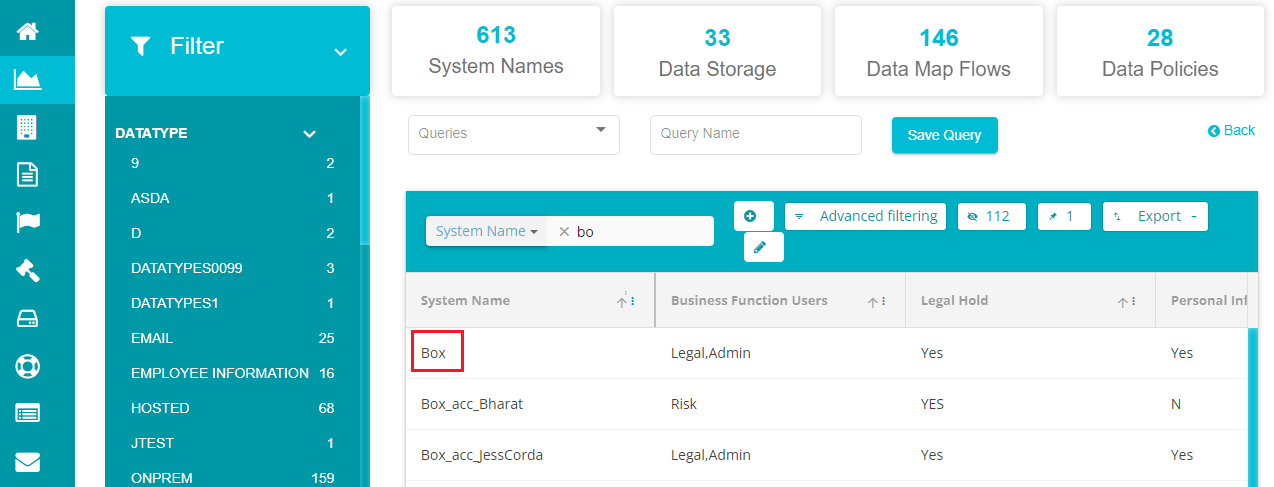
You can now add a system (document-store type) and create search plans through your box user account.
- Creating a Box System
For adding a box system,
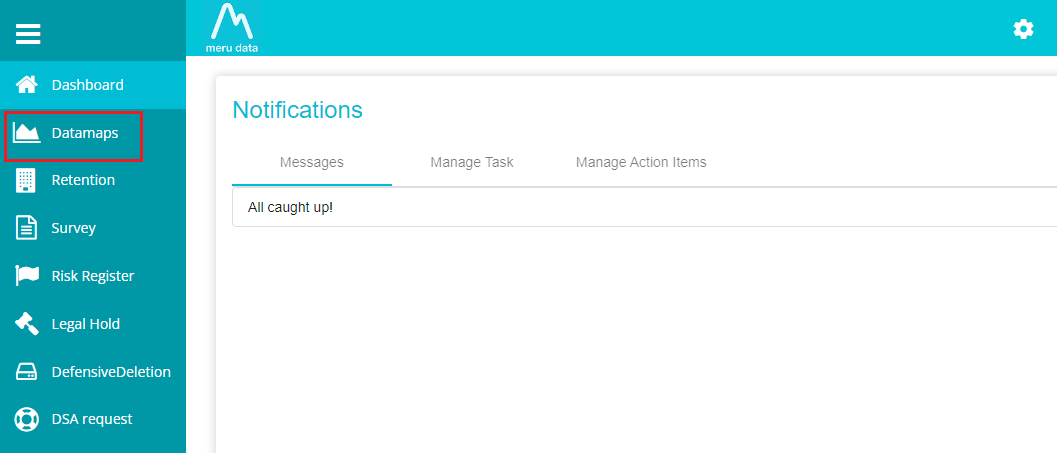
Click on the hamburger
 icon to open the menu.
Select 'Datamaps' option.
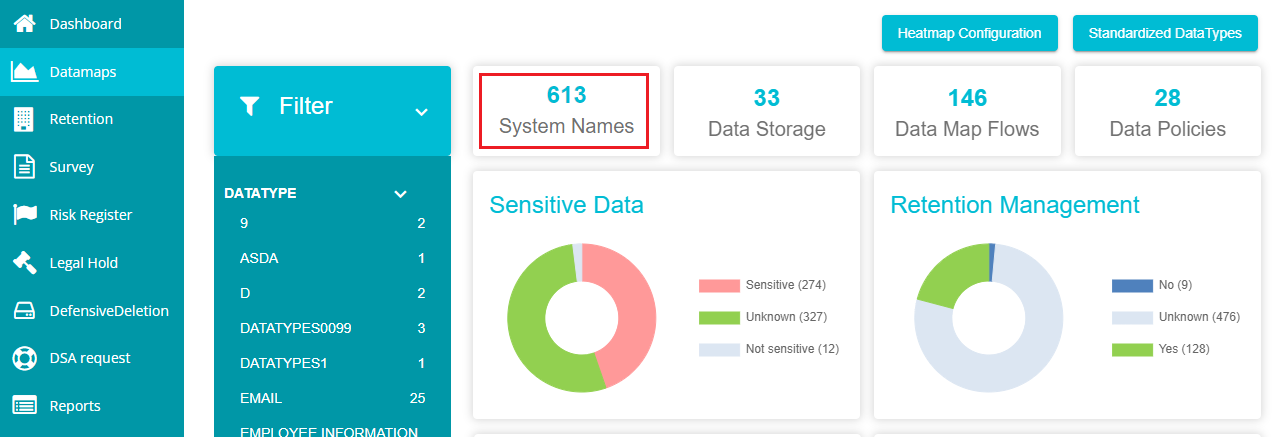
- Click on 'System Names'.
Click on the
 icon present on the screen.
Click on the edit icon and type the system name in the dialog box appearing under the System Name option on the screen.
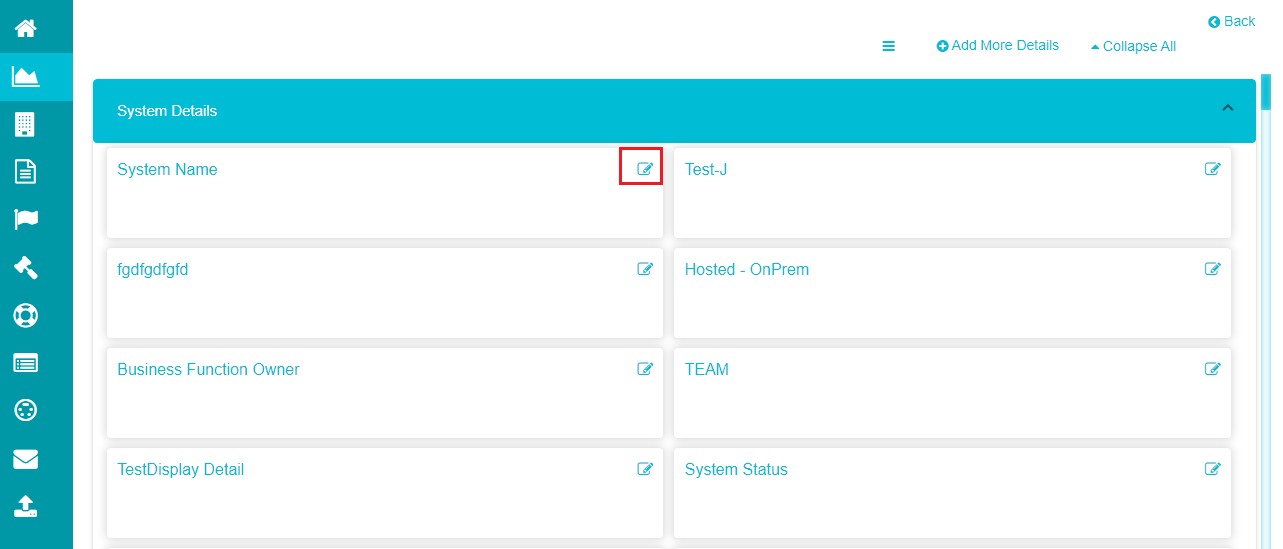
Scroll down to reach the 'Other Group' configuration on the screen.
Click on the edit icon next to the 'Is Document Store' option.
Enter True in the dialog box appearing on the screen.

Note: You can enter any character as input in the 'Is Document Store' dialog box, apart from entering 'False'. The input is considered True, and a document-store system is created.
- Adding Sub-systems within a System
After creating a document-store Box system, you can add sub-systems/users within the system for configuring the authentications and running the search plans. You can configure multiple subsystems for a system.
For adding new sub-systems,
Click on the hamburger
icon to open the menu.Select 'Datamaps' option.
- Click on 'System Names'.
- Select 'Box' system from the list.
- Click on the 'Subsystems' tab and tap the '+' icon on the screen.

Enter the 'Subsystem ID'.
Give a name to the sub-system under the 'Subsystem Name' column.
Click on 'Update subsystems' to save the changes.
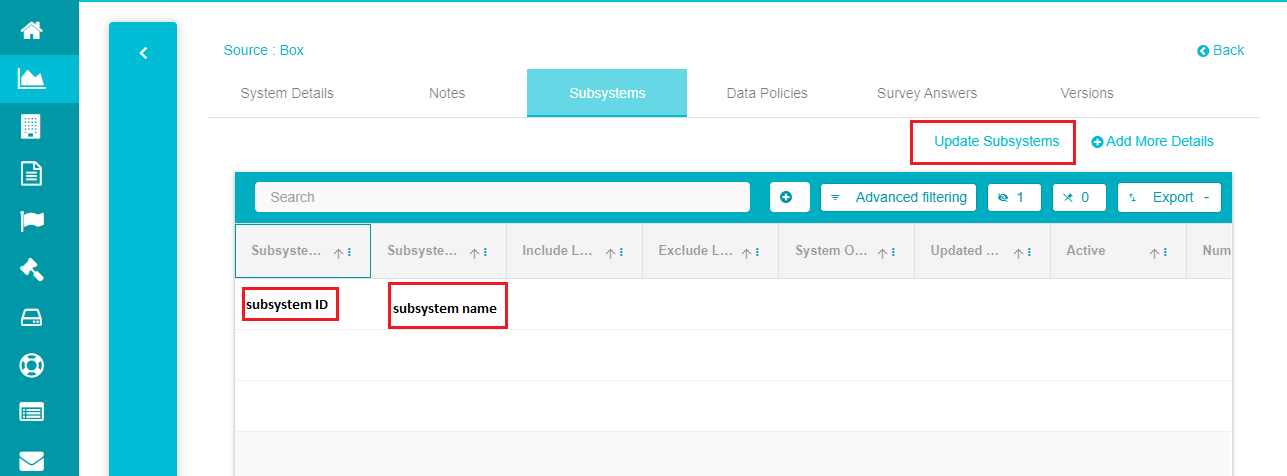
You can now see the new subsystem being displayed on the screen along with the existing ones, if any.
- Agent Settings
Creating a search plan first requires the Agent to be configured where the users can decide the authentication type, and if metadata (information related to the file including the name, path, file size, modified date, etc.) is to be imported completely, partially, or no metadata at all.
- Click on the hamburger
icon to open the menu.
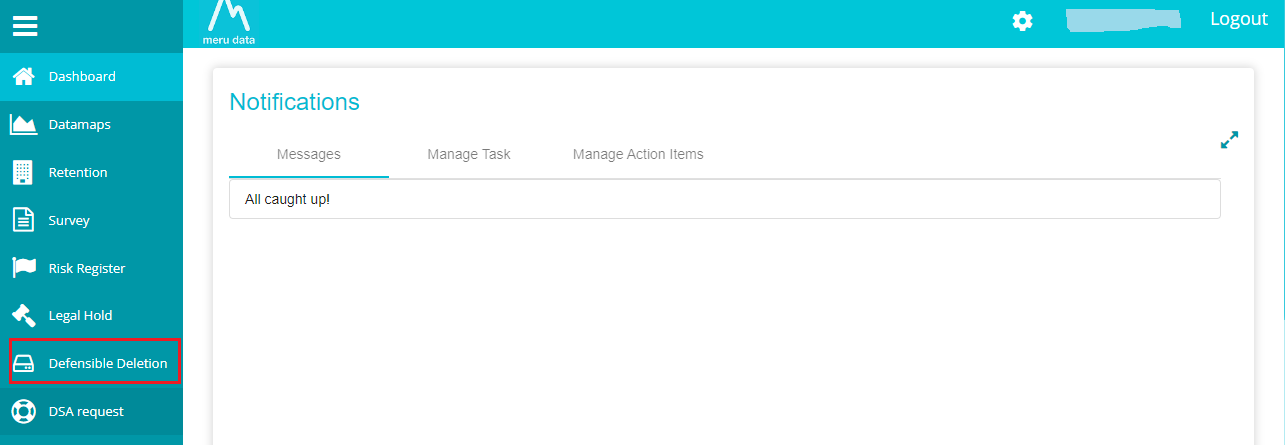
- Select 'Defensible Deletion' option from the displayed menu.
This selection takes you to the Defensible Deletion homepage, where you can see all the search plans related to the system.
- Click on 'Agent Settings'.
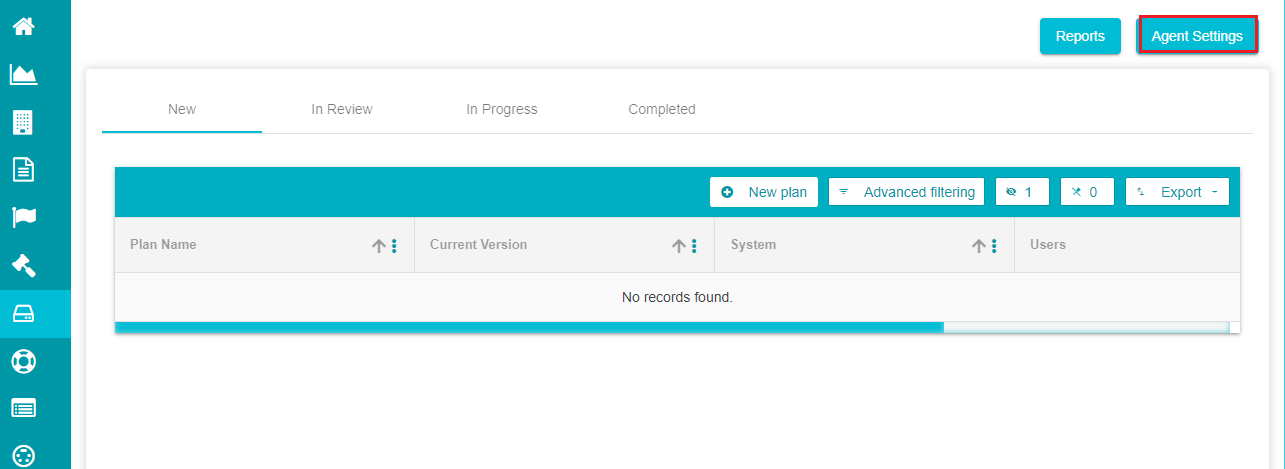
- Pre-defined Box agent settings can be seen on the screen based on the selected tenant.
If the settings aren't defined, you can see the following screen.
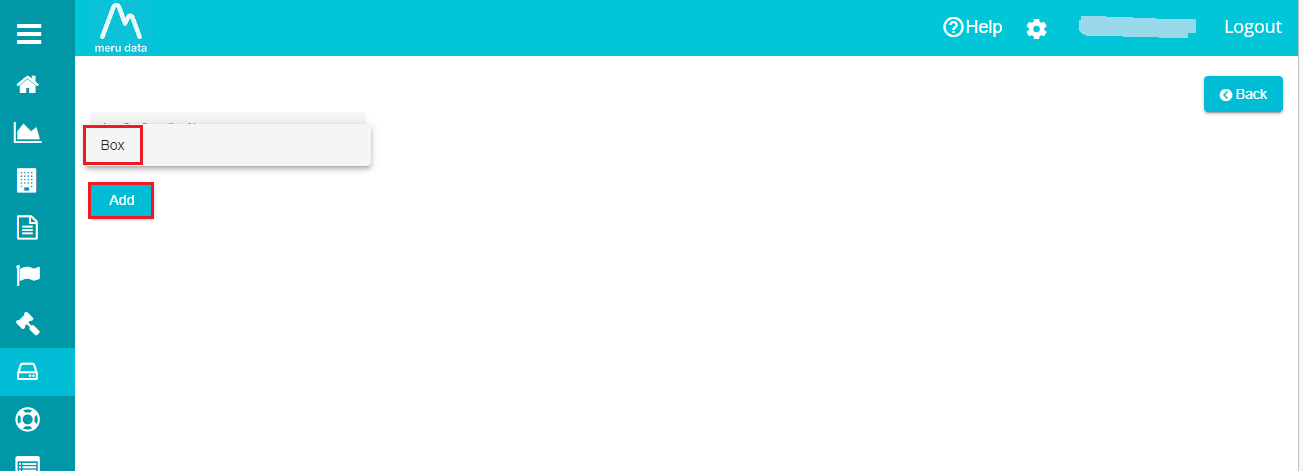
Open the 'App Configuration Name' drop-down menu and select the required agent for modifying/configuring its settings.
Click on 'Add'.
This selection does two things -- creating a configuration shown on the screen and creating a search plan.
Note: the plan created here is a continuously running search plan, used to constantly monitor all the files with retentions applied to them. This plan is only visible in the 'Reports' tab of Defensible Deletion.
A user with the Admin permissions can control the execution of the Monitor Retention Files plan created here.
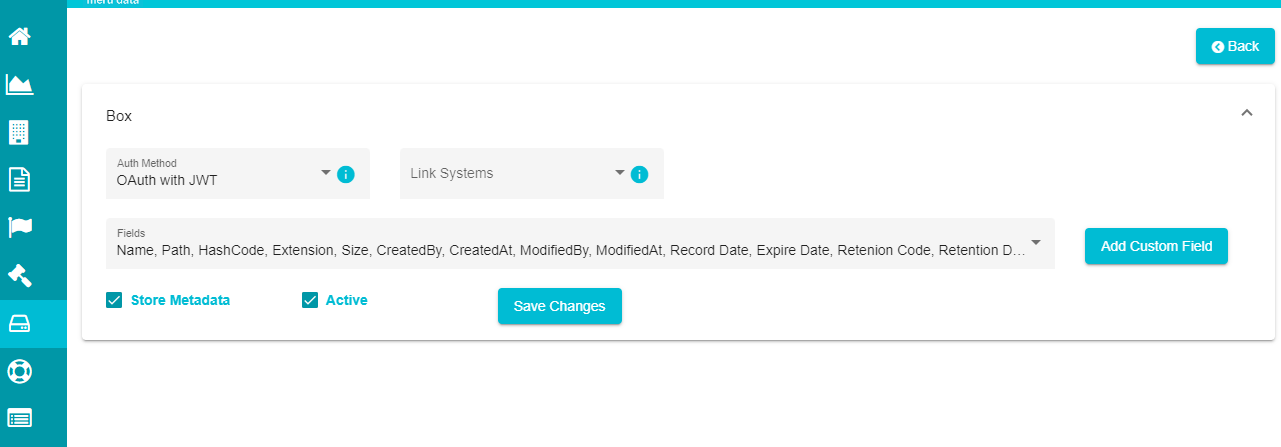
Note: Some settings like the authentication type, metadata, fields to be included in metadata, etc., for the box agent can be updated through this screen.
- Open the 'Auth Method' drop-down menu.
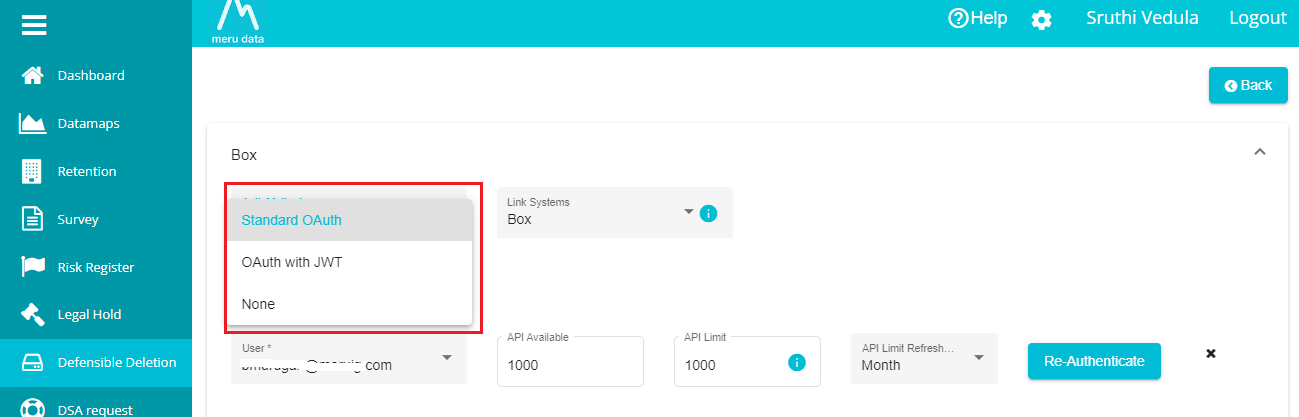
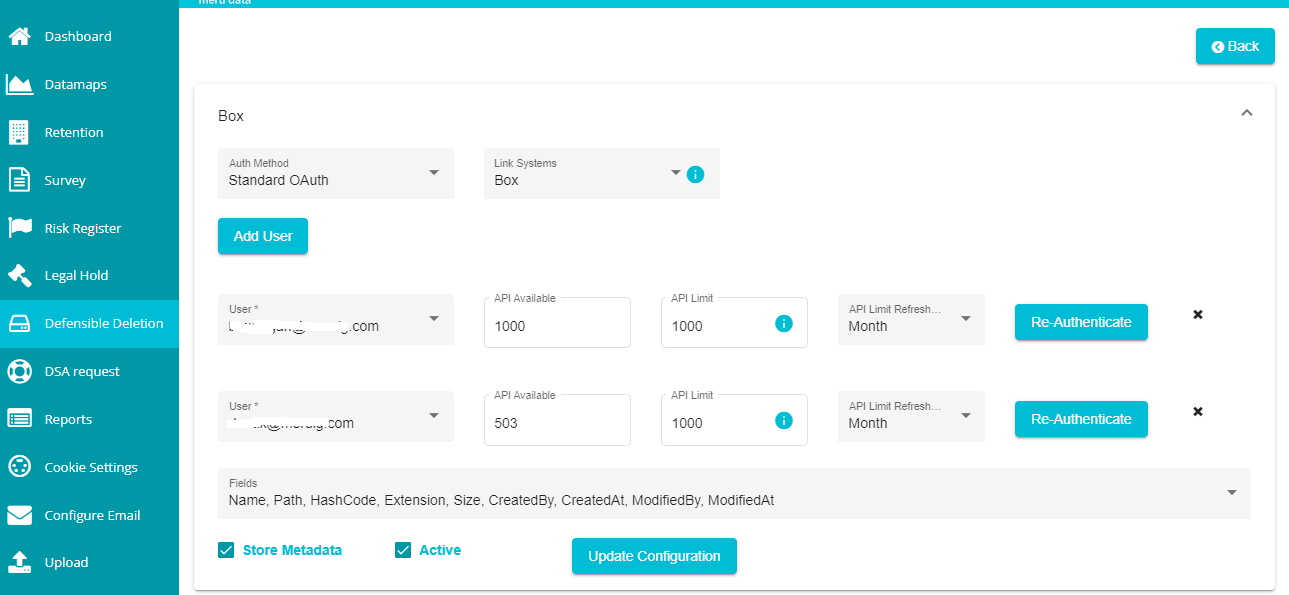
The menu provides two different authentications -- Standard OAuth and OAuth with JWT.
OAuth with JWT -- here, the agent takes the service account into consideration and generates a token that automatically switches to your BOX user account to run the search plan.
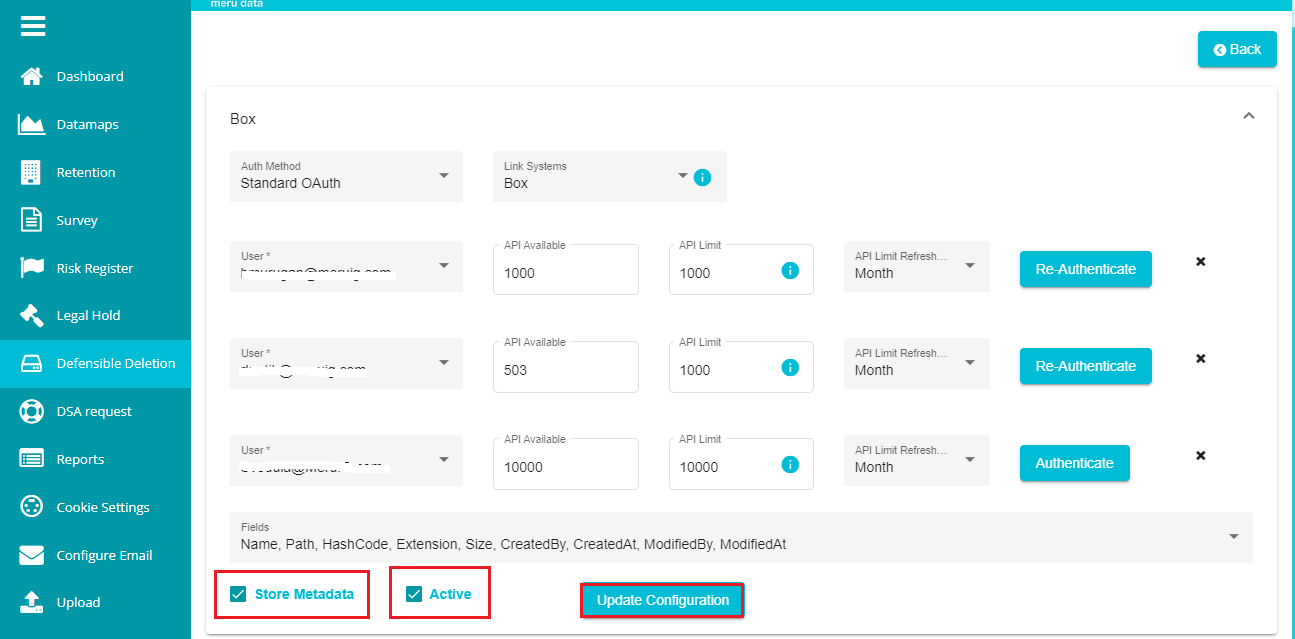
Standard OAuth -- in this case, the agent prompts for another screen asking the user to log into their box account (if not logged in) and displays all the accessible permissions related to this account. It then creates a token for this user account to execute the search plan.
Note: Link System will be 'Box' in this case since we are working on the Box system.
When selecting standard authentication, you must define the users, authenticate them, and continue defining the metadata fields. For that,
The 'Add User' button pops up on the screen as soon as the link system is selected.
Click on the
 button on the screen.
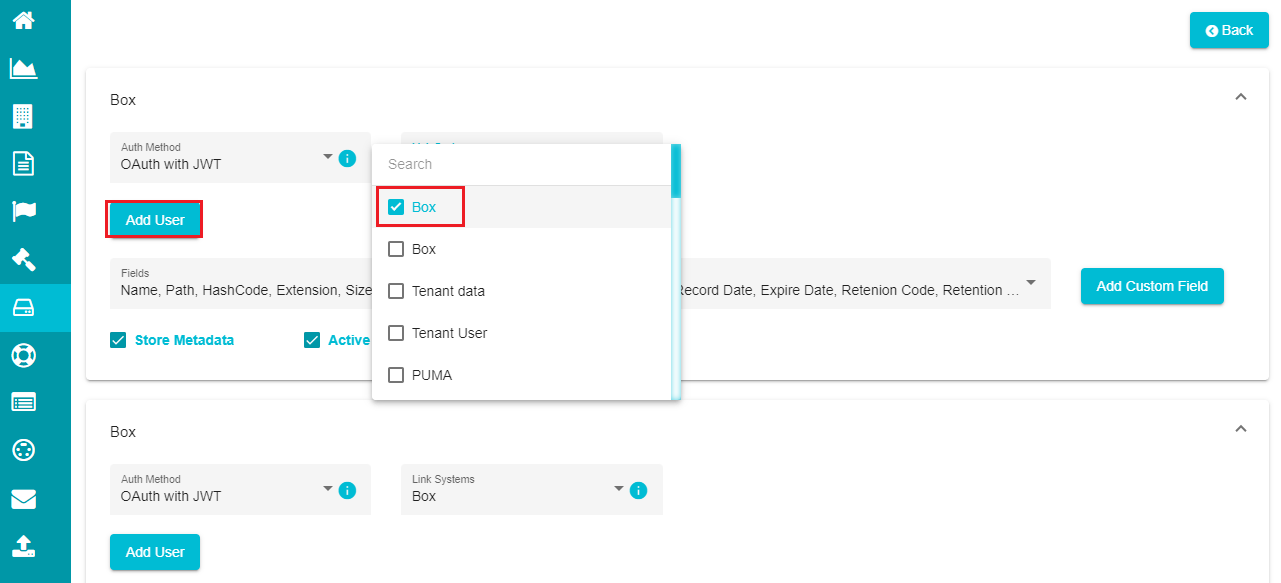
- Click on the Sub-system dialog box to open the drop-down menu.
Note: This menu provides a list of all the sub-systems/ user accounts linked to the Box agent. You need to specify the Box user ID as the sub-system.
Select the 'sub-system' from the menu.
Enter the 'API Limit' value. You can also use the up-down arrow present on the dialog box to increase or decrease this value.
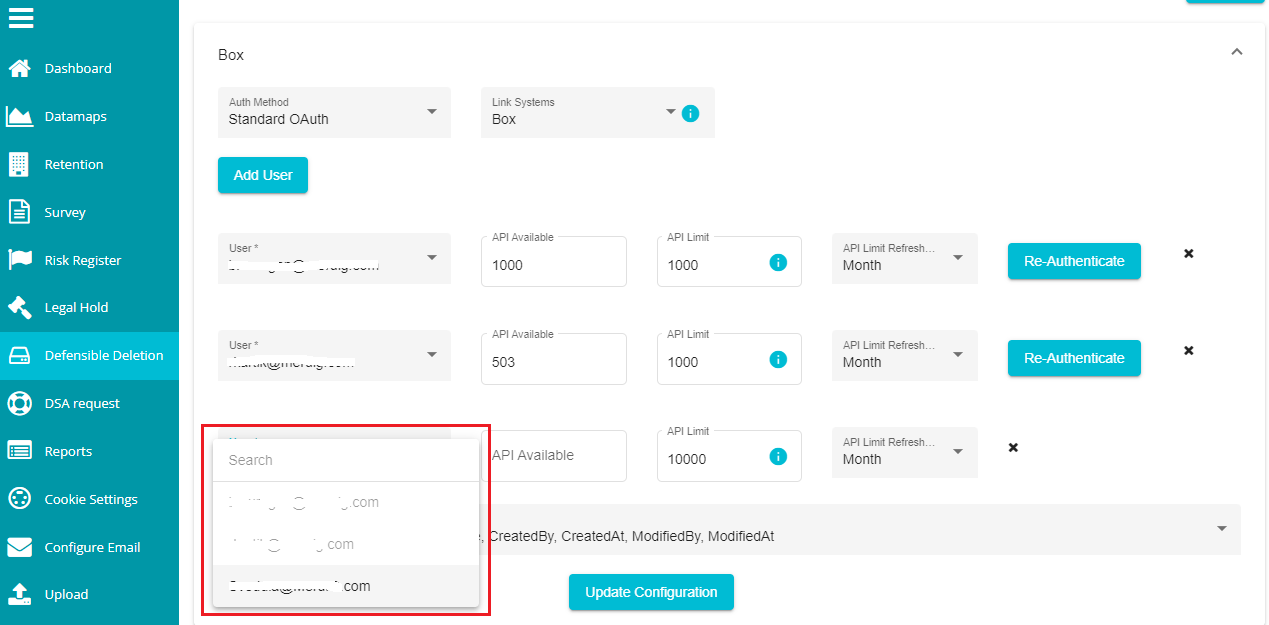
Note: API Limit specifies the number of network-calls the Agent can make with box. Per month, Box allocates API calls to each user based on the subscription chosen by them. So, you can specify this number at requirement. Also, you cannot use all the API calls allotted to you, since the BOX providers would also need some API calls to execute your search plans.
- Open the API Limit Refresh drop-down menu and select the refresh duration for the rate limiter from the menu.
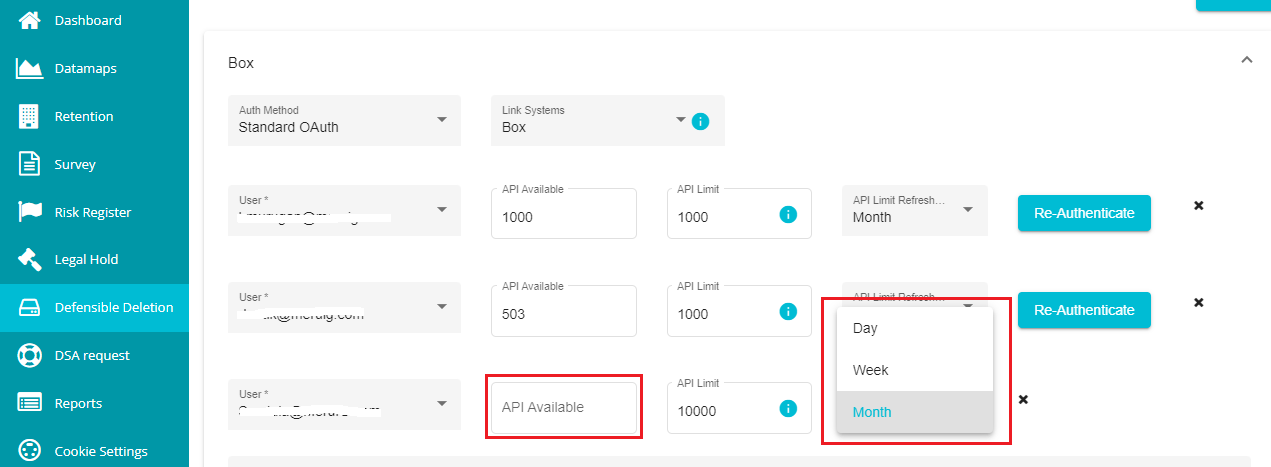
Note: API Limit Refresh restricts the API Limit calls until the duration specified by you. If the agent reaches the API call limit before the Refresh duration, it should wait until the duration specified by you is complete and then make the calls to box.
API Available reflects the number of API calls remaining until the refresh time. The system automatically changes this number whenever the Agent makes API calls for search plan execution.
- Click on 'Update Configuration' on the screen after adding these details.
When selecting Standard OAuth, you can see the 'Authenticate' button next to every user that you've added. You need to authenticate each user.
Note: Whenever you make any changes to the user's settings, you can see the 'Re-Authenticate' button showing up, requiring you to re-authenticate them through the same process.
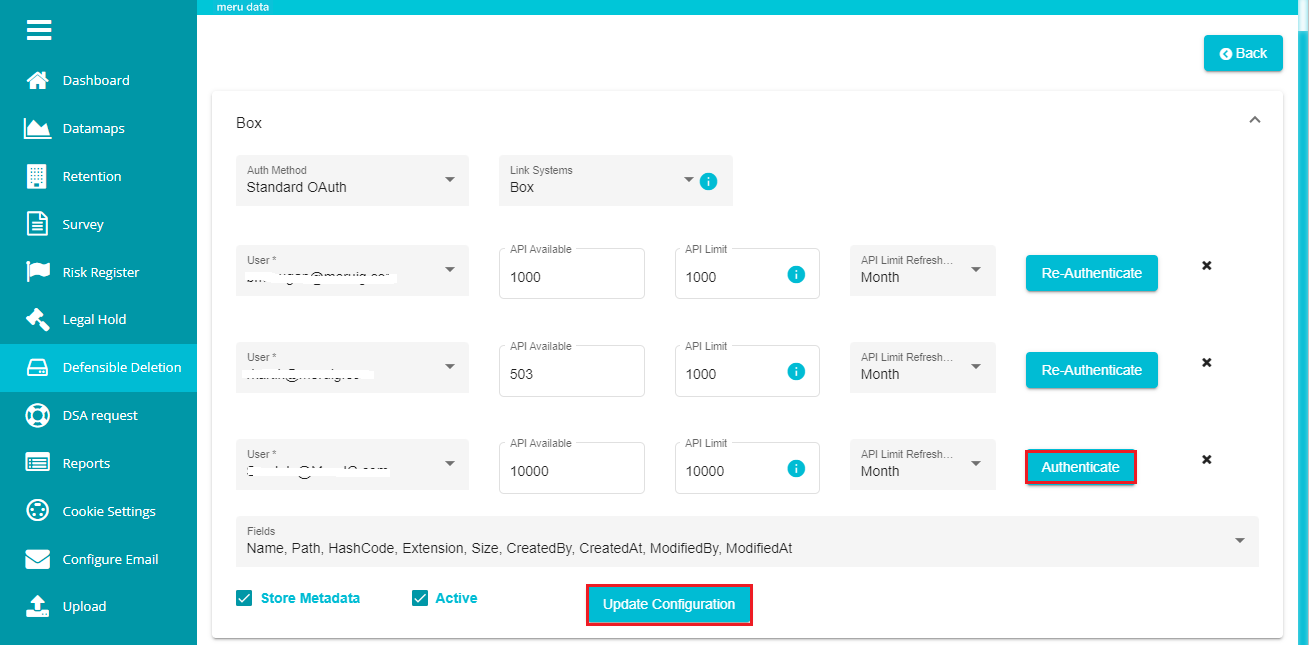
- Click on the 'Authenticate' button and you'll now be redirected to the following screen.
Note: BOX login screen only appears if you haven't logged into your box user account on the device. If logged in, the Authenticate button directly takes you to the permissions screen.
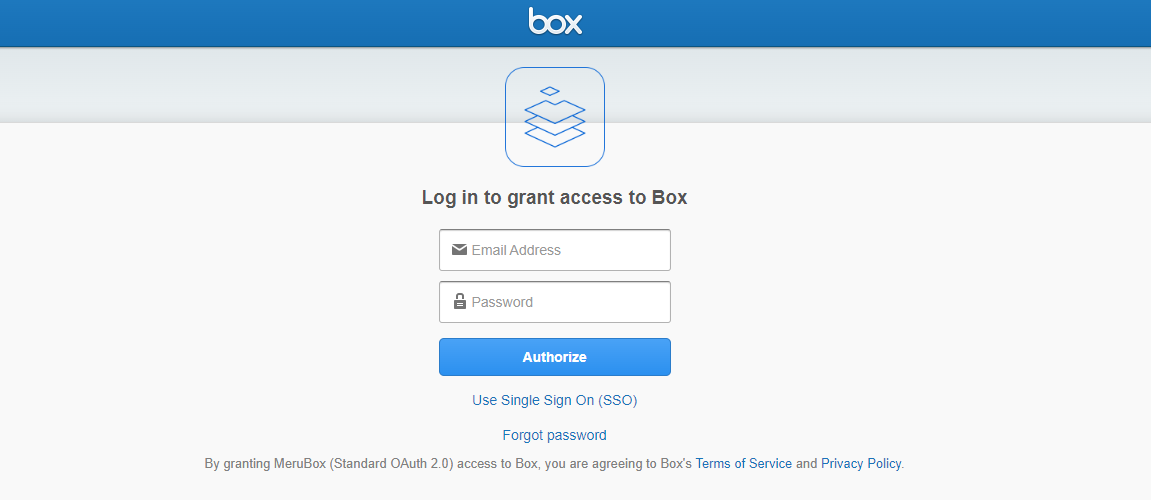
- Log in with your BOX credentials.
After logging in, you can see the following screen showing all the permissions required for the agent.
- Click on the 'Grant access to Box' button on the screen.
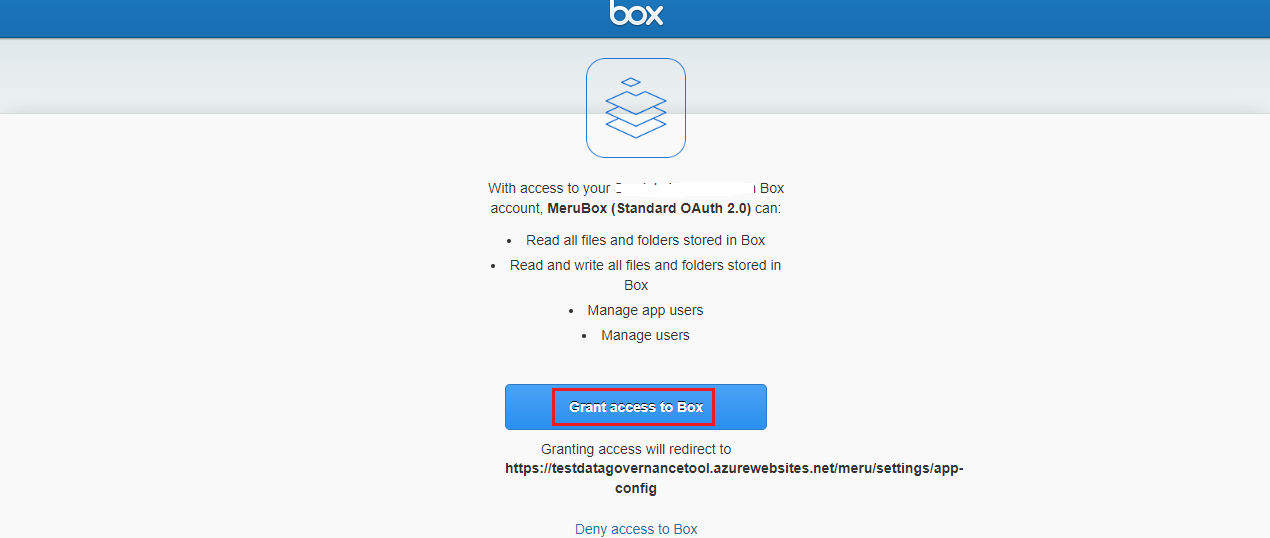
You are now redirected back to the 'Agent Configuration' window.

Note: when selecting OAuth authentication method, you don't have to define any users and continue with the following steps.
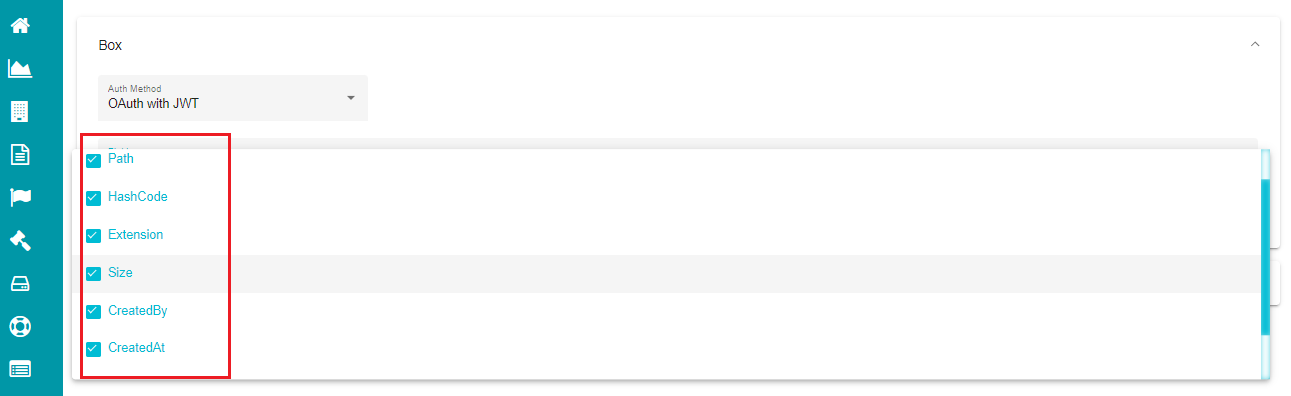
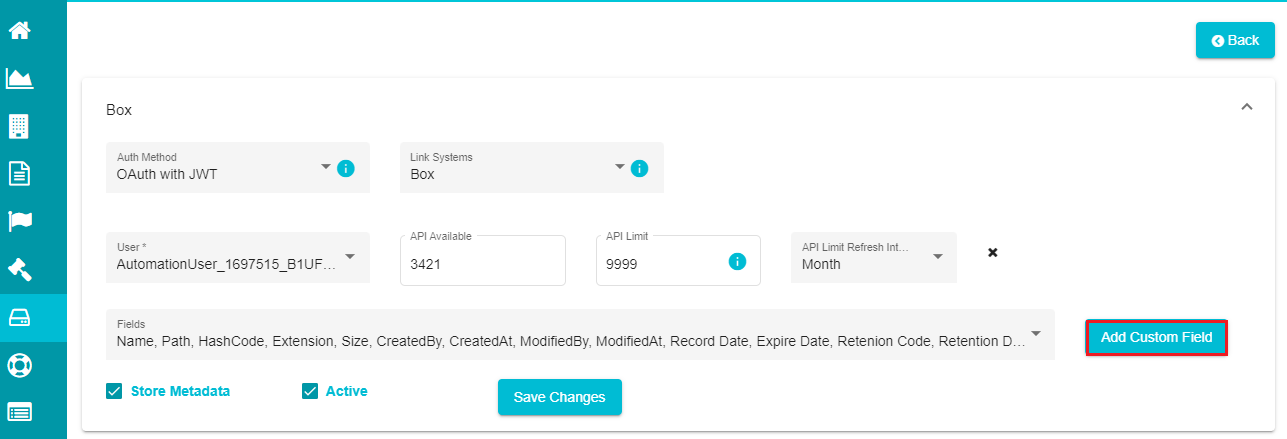
Open the 'Fields' drop-down menu.
Mark all the fields that you want to include in the metadata.
If you want to define any custom field in the metadata template,
- Click on 'Add Custom Field' option.
Note: You can only add custom fields and not the base properties in the metadata template.
Clicking on the Add Custom Field option pops up the custom field dialog box, in the following screen.
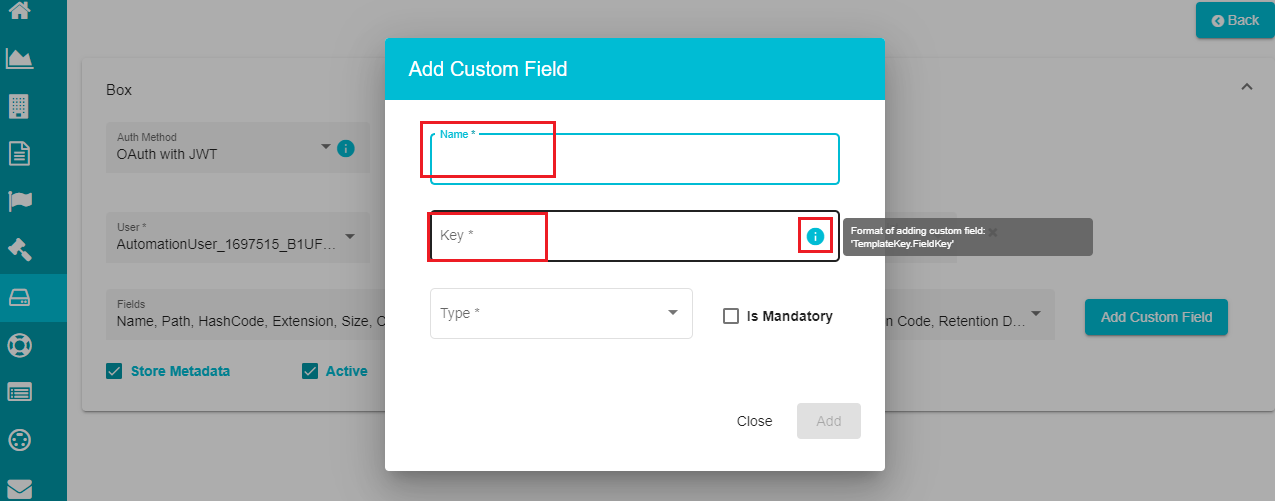
Define the name of the custom field in the 'Name' dialog box.
Enter the field's key in the 'Key' dialog box.
Note: for defining the key, you need to follow a specific format with a prefix (fixed for every custom field) and a suffix (varies based on the defined field).
Prefix -- metadata.enterprise.
Suffix -- templatekey.fieldkey
Prefix is predefined for every custom field, and you are to define the suffix based on the specified format. The 'i' button shows the format for the suffix part of the custom field being defined.
If there's a pre-defined key with the same name that you've defined, the screen prompts showing a message that the key with the same name exists.
Note: You cannot add any spaces when defining the key, but the name can have spaces. You can give any name as a display name to the custom field.
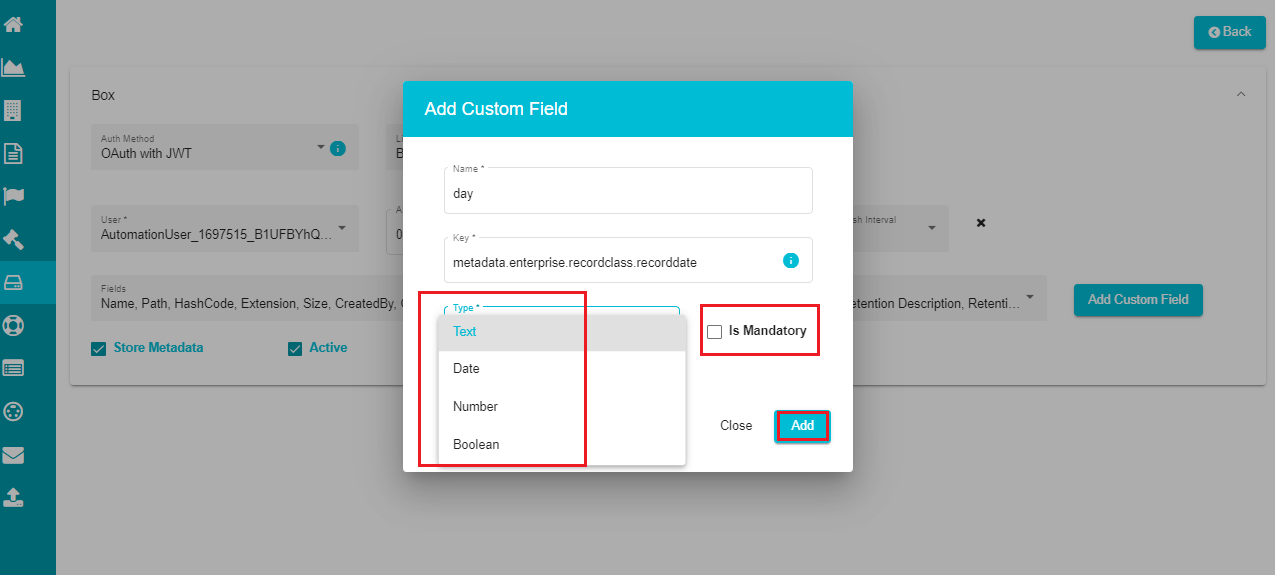
- Click on the 'Type' to open the drop-down menu.
The menu shows different options like string, bool, float, double, etc., to define the custom field type.
Select the required type from the menu.
Check the 'Is Mandatory' option if you want to mandate the defined custom field.
Click on 'Add' to add the custom field to the metadata template.
- Click on 'Update Configuration' button after making the changes.
Uncheck the 'Store Metadata' option if you don't want the agent to store the metadata after executing the search plans.
Note: The Name, Path, and Size fields' details are mandatory for every search plan and appear irrespective of you checking or unchecking the Store Metadata option.
- Creating a Search Plan
The user can now create a search plan for a specific system and define the necessary actions to be performed through the plan.
For creating a new search plan for the Box system,
Click on the hamburger
icon to open the menu.Select 'Defensible Deletion' option from the displayed menu.
The selection shows Defensible Deletion dashboard where you can find all the existing search plans.
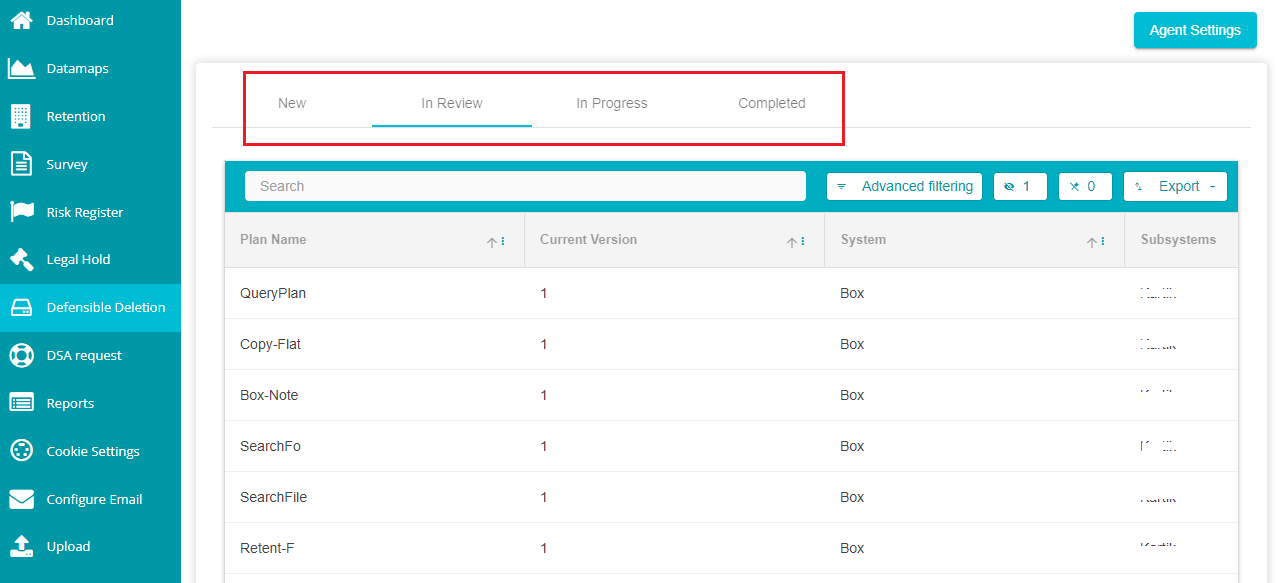
New -- under this tab, you can see all the newly created search plans.
In Review -- this tab shows all the search plans that are under review.
In Progress -- here, you can find all the search plans that are being executed by the agent.
Completed -- this screen shows the list of all the search plans that are complete, and their results are available.
Note: Refer to this guide - Grid.docx for more information on navigating through the grids in each tab and different options available to filter the data displayed on the screen.
- Click on the
 icon next to the Search Bar on the New
tab to create a new search plan.
icon next to the Search Bar on the New
tab to create a new search plan.
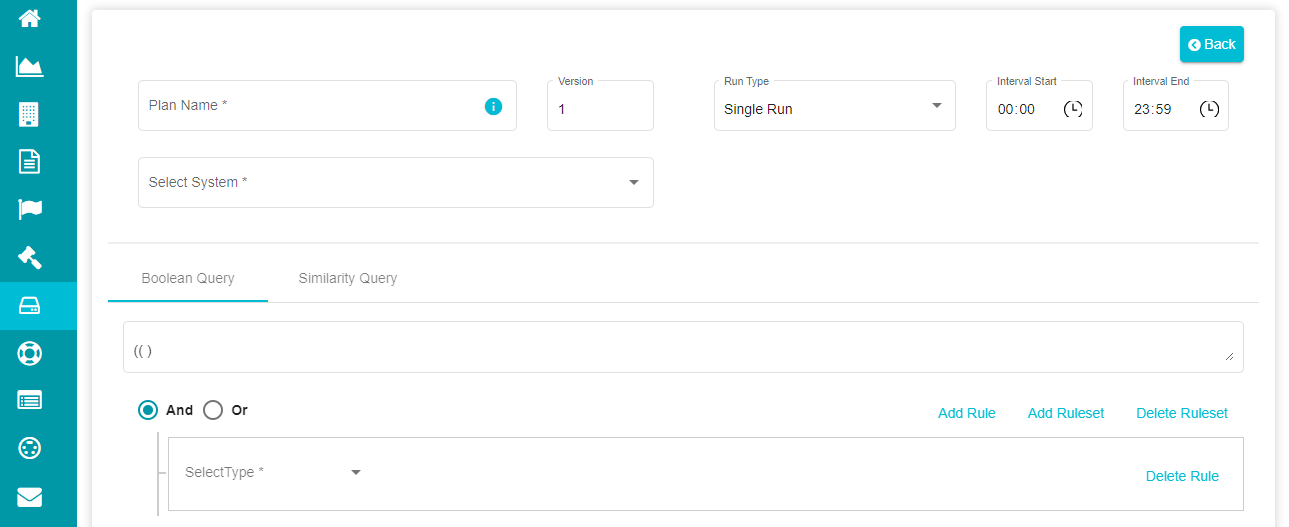
The search plan configuration screen is displayed, and a new search plan can be configured.
- Type the search plan's name in the 'Plan Name' dialog box.
Note: Version is a number reflecting the modifications made to a specific search plan. Initially, it is numbered as 1 and changes to 2, 3, and so whenever a modification is applied to the plan.
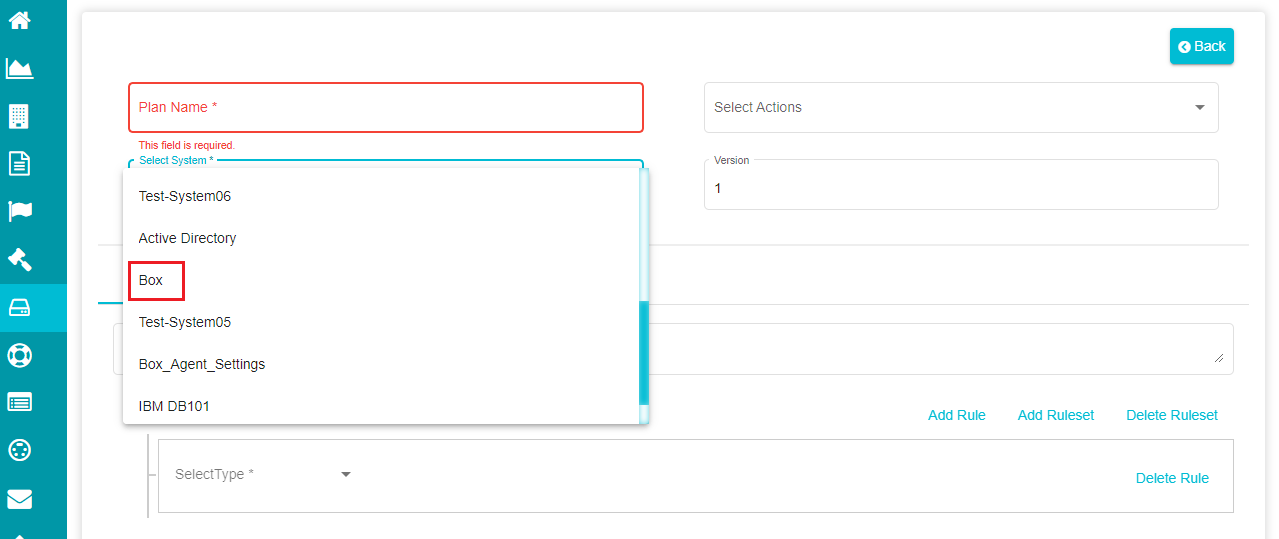
Note: Numbers and characters can be used for naming the plan. Plan Name should have a minimum of 4 characters and a maximum of 10 characters. You can only use an underscore (_) or a hyphen (-) from special characters in the plan name. Open the 'System' drop-down menu and select 'Box' from the menu.
- Check the
 option if you want to execute the
search plan on the entire Box system.
option if you want to execute the
search plan on the entire Box system.
Note: When selecting Enterprise-wide Search, the Select Subsystems drop-down is disabled and the search query applies to every sub-system that is a part of the main Box system.
- Click on the 'Select Subsystems' to open the sub-systems drop-down menu.
The menu shows different subsystems/users linked to the selected system. Select the appropriate one from the list to continue with the search plan.
- Check the required subsystem from the list.
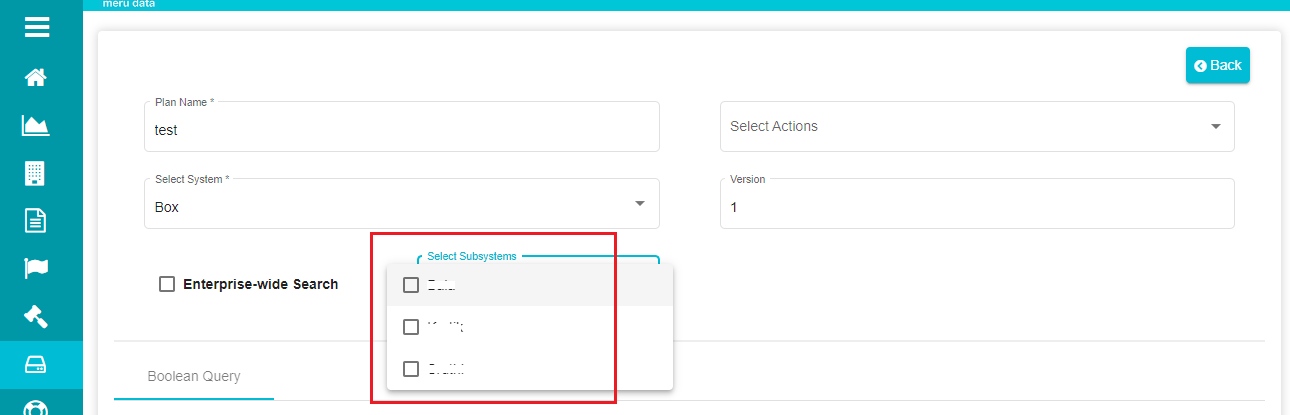
Note: You can either select a single subsystem or multiple subsystems displayed on the screen to run the search plan query.
As soon as you select the required subsystem, you can see a new column appearing on the screen for defining the search location and excluding any location.
- Click on the file icon on the screen to define the 'SearchLocation' and specify the path to be followed for performing the search.
Note: You can only mention a folder's path in the search location and not a file path. If you want to run the search on files within a folder, you need to use the additional filters and define the file's path.
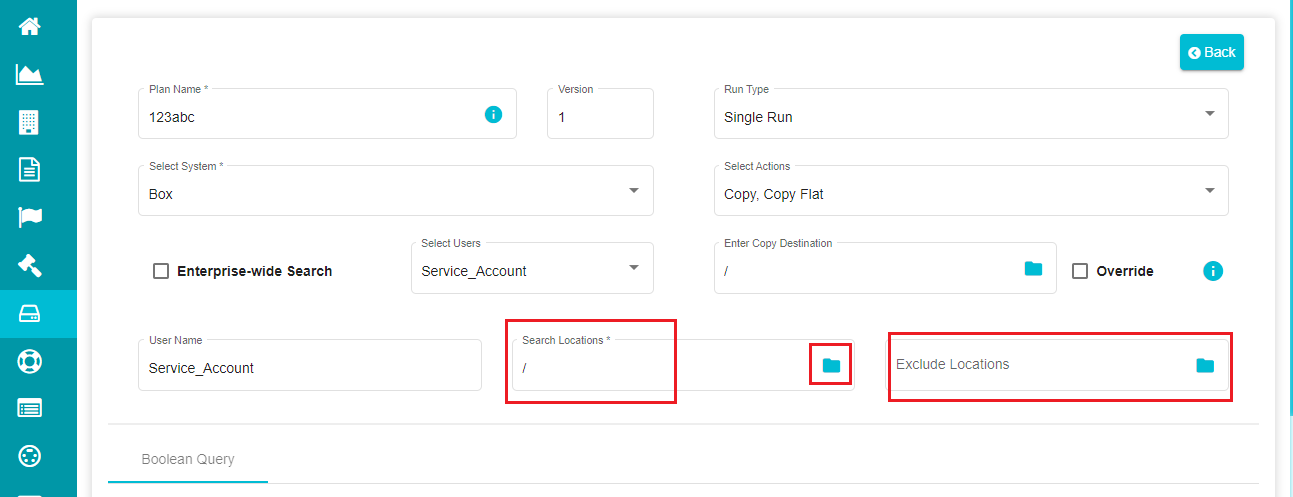
Note: The search location has '/' as input by default, and if you don't want to specify any location, you can leave it as it is. In this case, the agent performs the search query on the entire root directory.
The selection pops up a window where the search location folders can be selected.
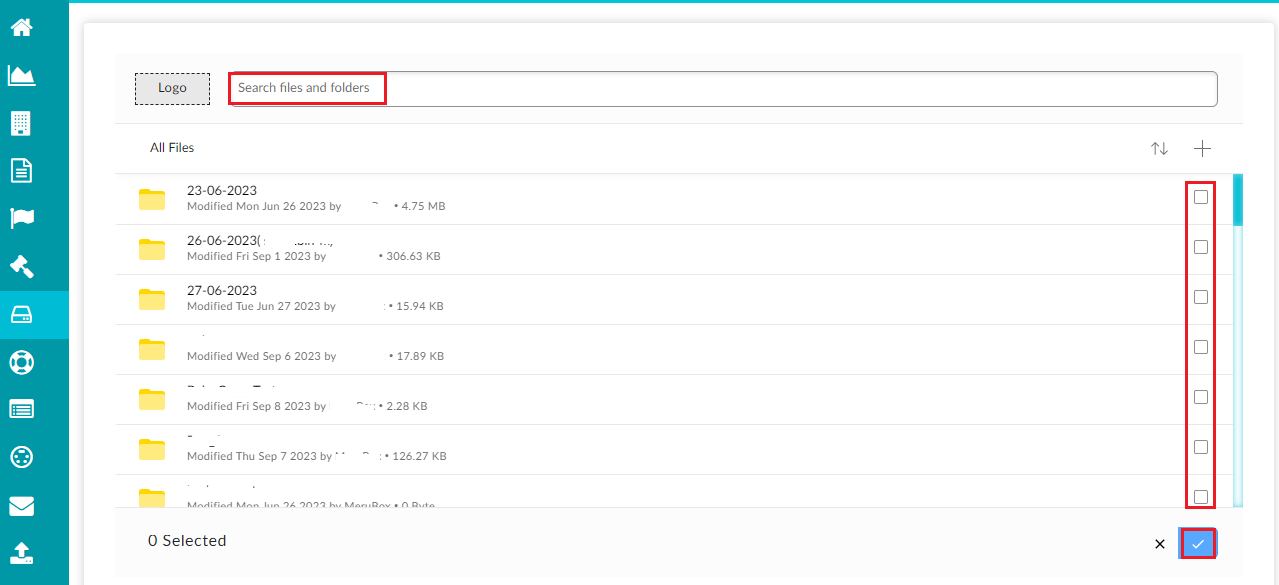
The screen shows different folders present in the selected sub-system/user on which the search is being performed.
- Select the required folder(s) from the list.
Note: you can use the search bar to search and select specific folders.
Click on the tick icon after making the selection.
If you want to select sub-folders within a folder, click on the required folder to open its contents.
The screen shows different folders/files within the selected folder. You can select the required ones from the list.
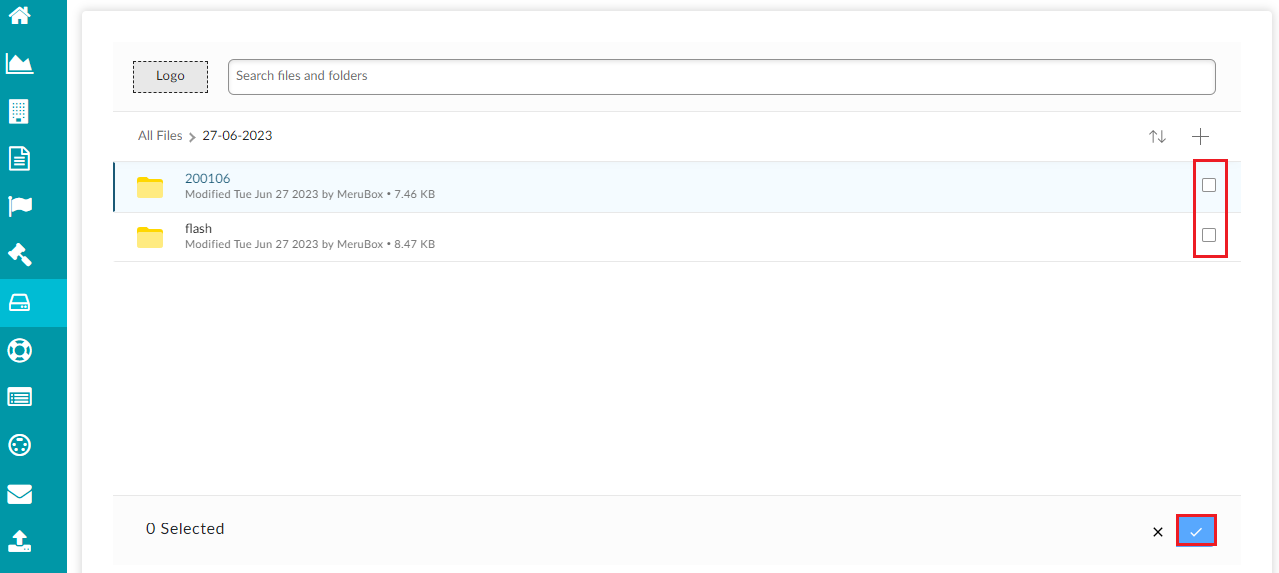
Note: the screen redirects to the main search plan screen after clicking on the tick mark.
The 'Exclude Location' option can be used to exclude specific locations (files/folders) when performing the search. You can define the exclude location in the same way as the search location.
For defining multiple paths in the search and exclude locations, follow the format mentioned above with a comma separation between the paths. You cannot use spaces after comma when defining multiple locations.
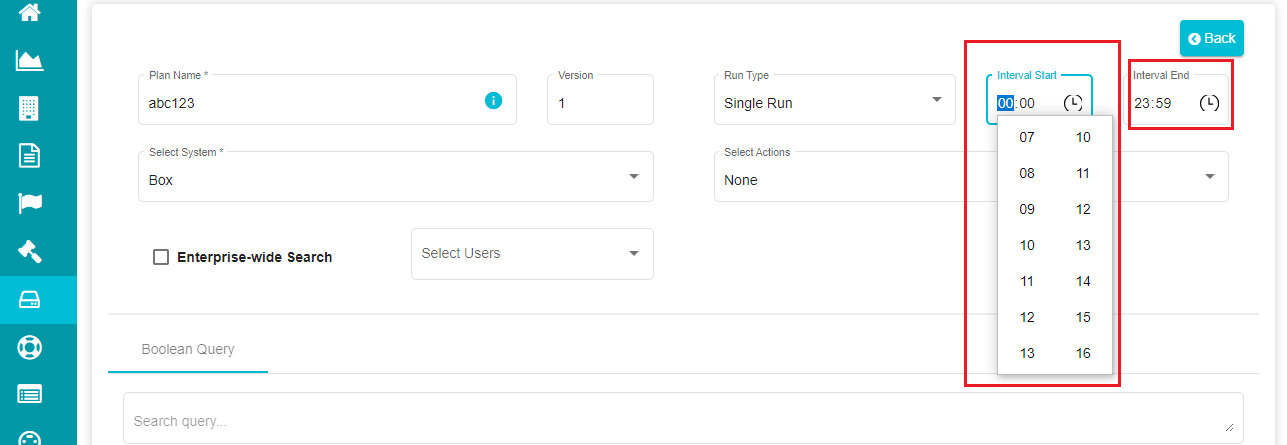
Note: you can configure the starting and ending intervals of executing the search plan irrespective of the run type selected.
The plan runs throughout by default. You can restrict that and select the required timings using these options.
Interval Start -- time when the agent can start executing the search plan.
Interval End -- time when the agent must stop executing the search plan.
- Enter the specific time for 'Interval Start' and 'Interval End'.
Note: you can also use the time icon to select the required time.
- Click on the 'Run Type' to open the drop-down menu.
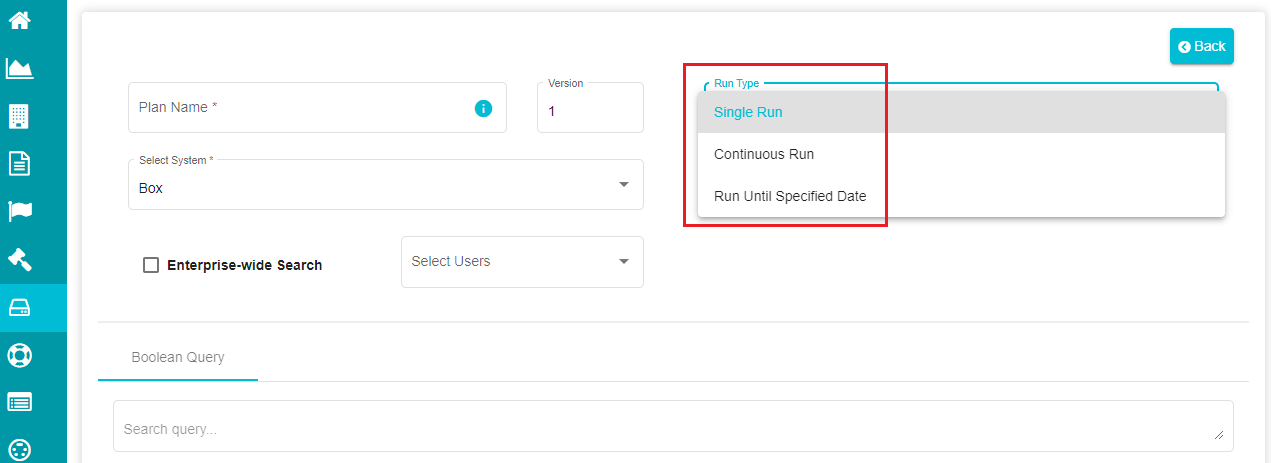
Note: Run Type reflects the number of times the Agent executes the search plan that you've created.
Single Run -- the plan is executed once, and the results are displayed after the execution.
Continuous Run -- here, the plan is executed continuously whenever the Agent crawls, until you manually stop the execution. To stop the execution, go to the 'In Process' stage of the Defensible Deletion homepage and you'll find an option to complete the plan. The results shown for such plans are the results obtained from the last crawl of the Agent before you click on the plans.
Run Until Specified Date -- this type can be used if you want to run the search plan until a specific date at requirement.
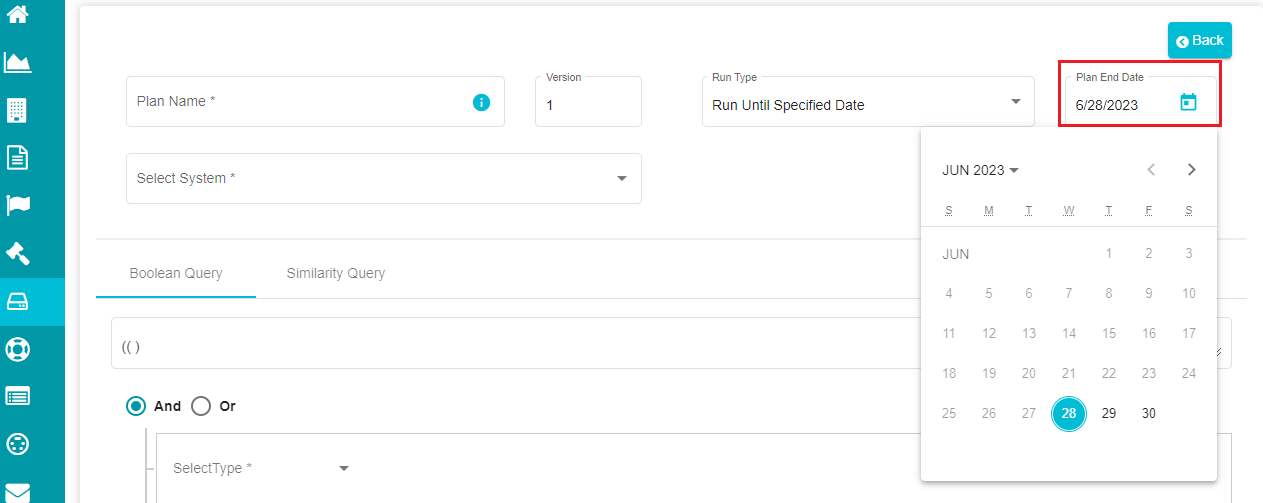
When selecting 'Run Until Specified Date', the screen prompts with another option asking you to select the end date.
Click on the calendar icon present in the 'Plan End Date' dialog box.
Select the required date.
Note: by default, the Plan End Date is taken as the date when the search plan is being defined. You can change the date at requirement. The Agent executes the plan until this date, and you can see the results after that.
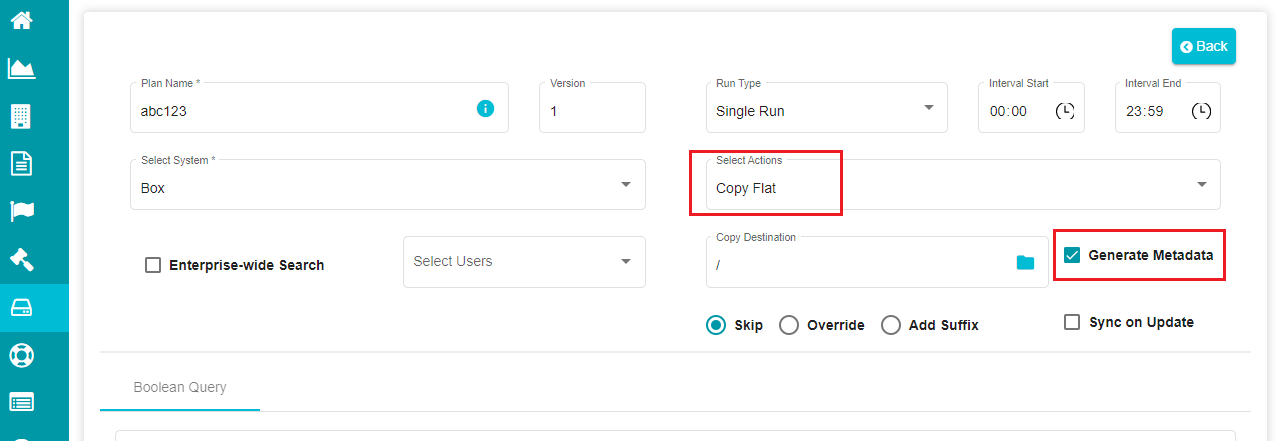
- Open the 'Select Actions' drop-down menu.
The drop-down menu shows five options -- none, retention label, rename folder, copy, and copy flat. You can select any one of these actions in a plan.
Retention Label -- this option lets you apply selected retention to the files/folders that are a part of the search plan.
[In case there is a new search plan conflicting with the files to which a retention is already applied, should make sure that such files are skipped and there is no overriding of retentions. The same must be notified to the user that certain files are being skipped in the new search plan.]
[Can be applied to the entire folder or some specific files inside the chosen folder. (Need to add a flag to make this selection possible).]
Copy -- copying the folder as it is to the destination locations while retaining its structure.
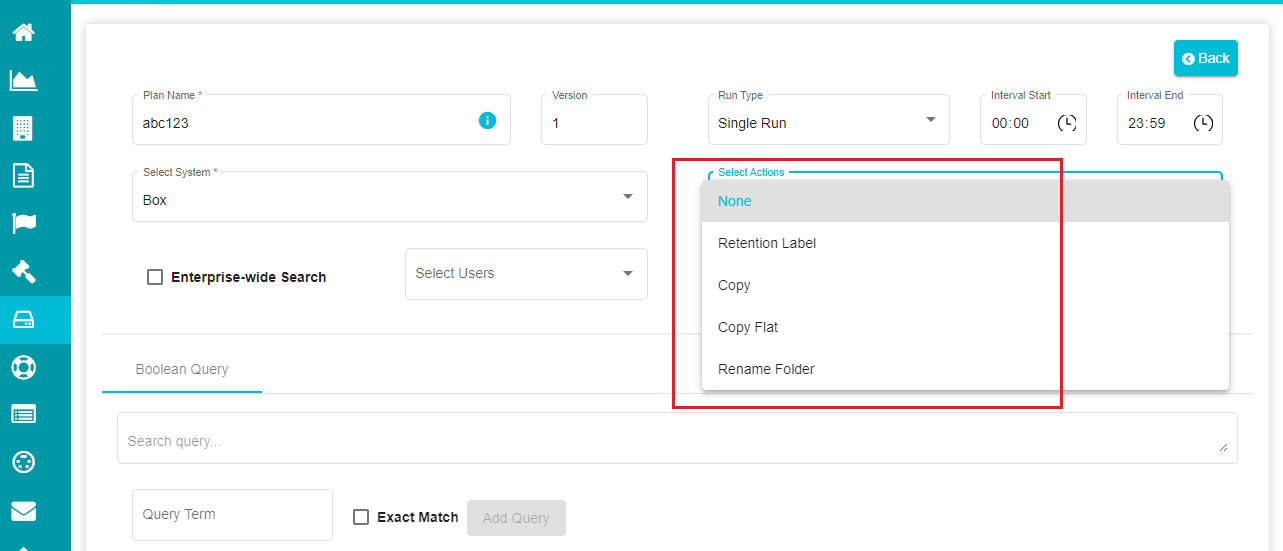
Copy Flat -- copying all the files as a flat structure in a single folder. A csv file is created containing information (path, created and modified date, extension, and size) of all the files being copied.
Note: These are related to file operations. The Rename Folder option is related to the folder operations.
Rename Folder -- used to rename folders defined in the search location.
a) When selecting 'Retention Label' from the menu, the screen prompts for the 'Select Retention' selection and 'Override' option.
Note: This menu only shows the list of retention classes applicable to the chosen system here.
- Select the 'Retention Record' from the Class Code drop-down menu.
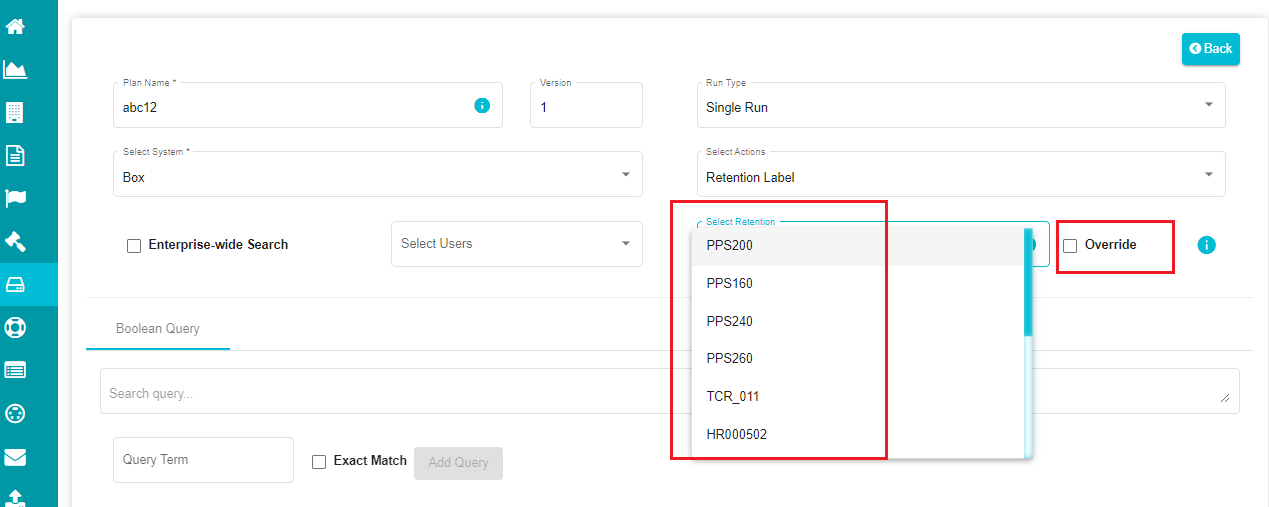
- Select the Retention Label that you want to apply for the search plan.
The screen now shows an 'i' button next to the retention class that you've selected. This button shows the details like applied systems, retention date, etc.
- Check the Override option if you want to replace the file's existing retention to the retention selected from the drop-down menu.
When enabling the Override option, you have multiple scenarios to alter the retentions.
Case -- 1: this case is simple, where the previous retention of the applicable files is replaced with the current retention.
Case -- 2: you can update the retention of the required files on the Reports screen using the 'Update Retention' or 'Pause Deletion' options. (Discussed in the Reports section below in detail).
Case -- 3: the Applied Date of the required files can be altered to change their date of deletion based on the applied retention. (As of now, the file expiry date depends on the applied date, so changing it can vary the actual date when the file is to be deleted).
b) When selecting 'Rename Folder' a new dialog box appears on the screen, asking for a new folder name.
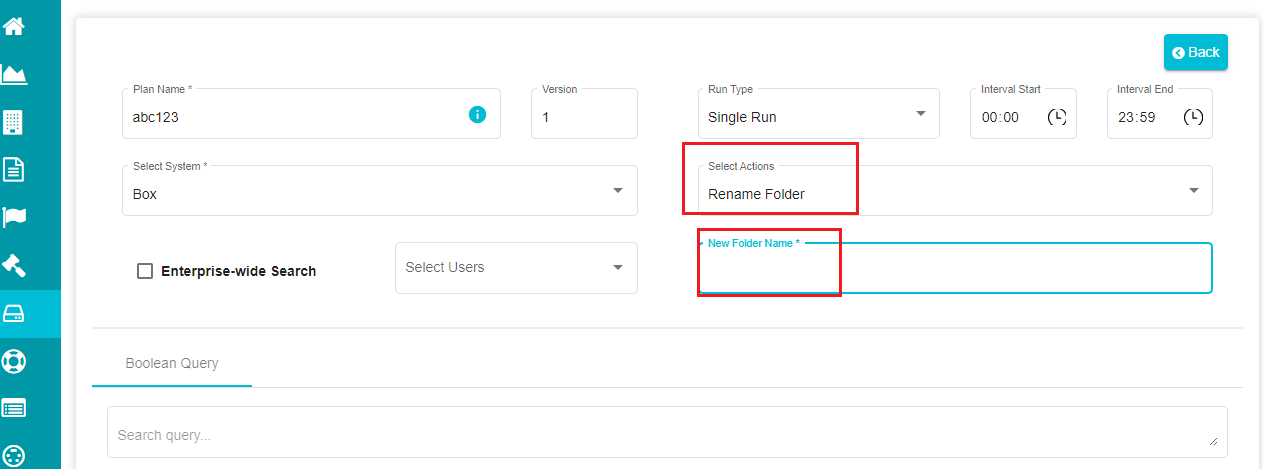
Note: You need to follow all the validations set by Box when renaming a folder. Also, the new folder name cannot be empty.
When defining the search location for Rename Folder, make sure that you specify the exact location where the folder lies. Else the agent would consider the root directory and rename every folder with the name specified.
Note: Define a search query by adding 'Additional Filters' in this case to search for folders within the Search Location and rename them. Else, the agent would rename the specified Search Location.
c) When selecting Copy/Copy Flat from the drop-down menu, the screen prompts for 'Enter Copy Destination' option different operations for name conflict resolutions.
Here, you need to specify the location where you want to see the results after the search plan is executed and choose if you want to replace any existing file (with the same name) with the new file.
- Follow the same process used for defining the 'SearchLocation' previously for the 'Enter Copy Destination'.
Note: Here, the folder's name should be unique. In case the given folder already exists, you cannot see the search results after the plan is executed.
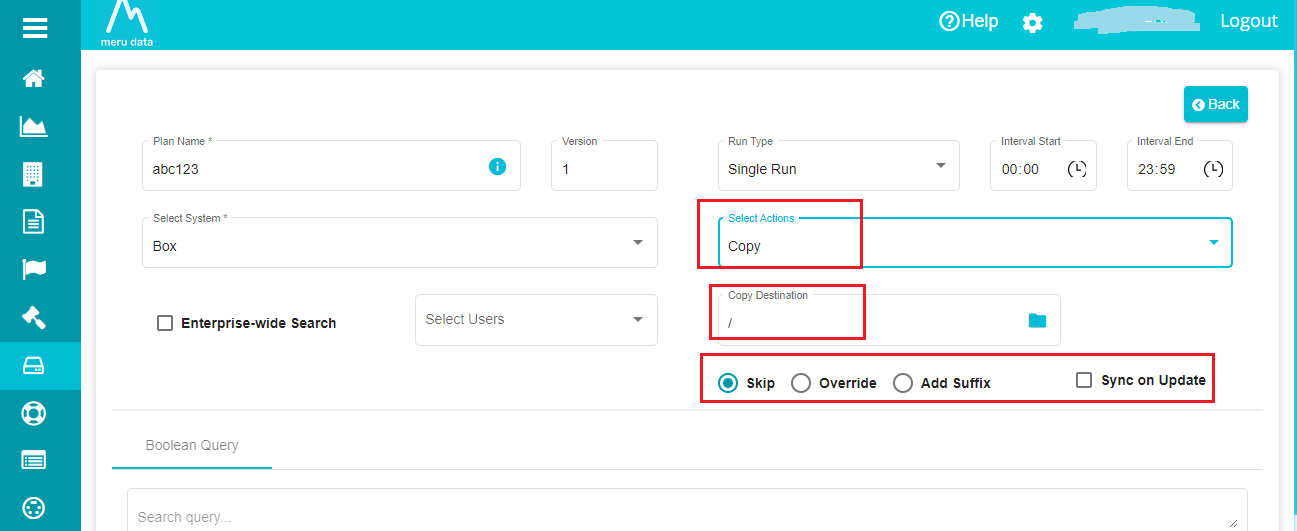
Skip -- selected by default. In case of name conflict, the file gets skipped when selecting this option.
Override -- overrides the existing file in case of name conflict.
Add Suffix -- adds a suffix (adds strings after file names) when a name conflict arises.
Sync on Update -- this selection syncs/copies all the modifications of the original file to the copied file.
Note: sync on update option is not applicable for single run search plans. This scenario works when the run type is continuous or until a specified time.
When selecting Copy Flat, you can see another option on the screen -- Generate Metadata.
Note: You can use this to opt out of generating metadata csv file in case of Copy Flat operation. Selecting this option creates a file with a summary of all the files included in the search plan.
None -- this action can be selected if you don't want to perform any operation or if you want to check how a plan is working. You can also use it for some verification purpose if you don't have the access to Box account.
You can define different search queries and customize the search plan to get the required results.
For that,
Under the 'Boolean Query' tab, click on 'Add Query' to add a new Boolean rule to the plan.
Define the query that you want to apply to the search plan in the 'Add Query' dialog box.
If you want to filter the files/ folders based on a single term,

- Define the term in the 'Query Term' dialog box.
Note: Defining the Query Term is mandatory if you want to add Additional Filters to the search plan.
Check the 'Exact Match' option if you want the results to be matching exactly with the Query Term.
Click on the 'Add Query' button to add the query.
If you want to add additional filters to the plan,
Click on the
 icon on the 'Additional
Filters' tab.
icon on the 'Additional
Filters' tab.Open the File Types drop-down menu and select the required file type.
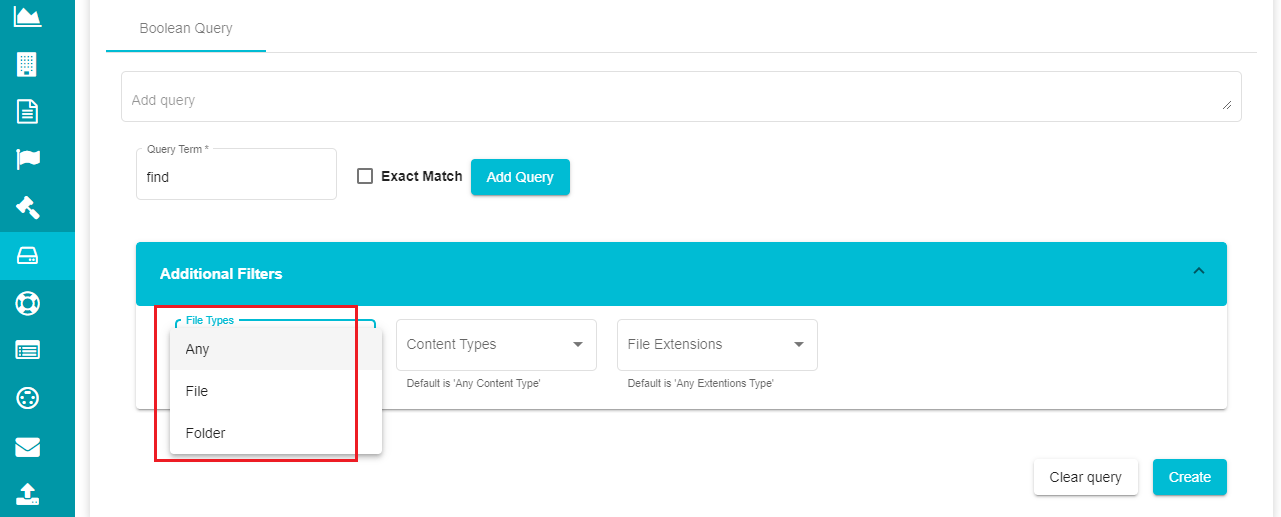
- Select the required content type from the 'Content Types' drop-down menu.

Open the 'File Extensions' drop-down menu and select the required file extensions.
Click on 'Create' after making the necessary selections.
Note: For detailed information on defining the search queries and query terms, you can refer to these links -- Search indexing, Query operators.
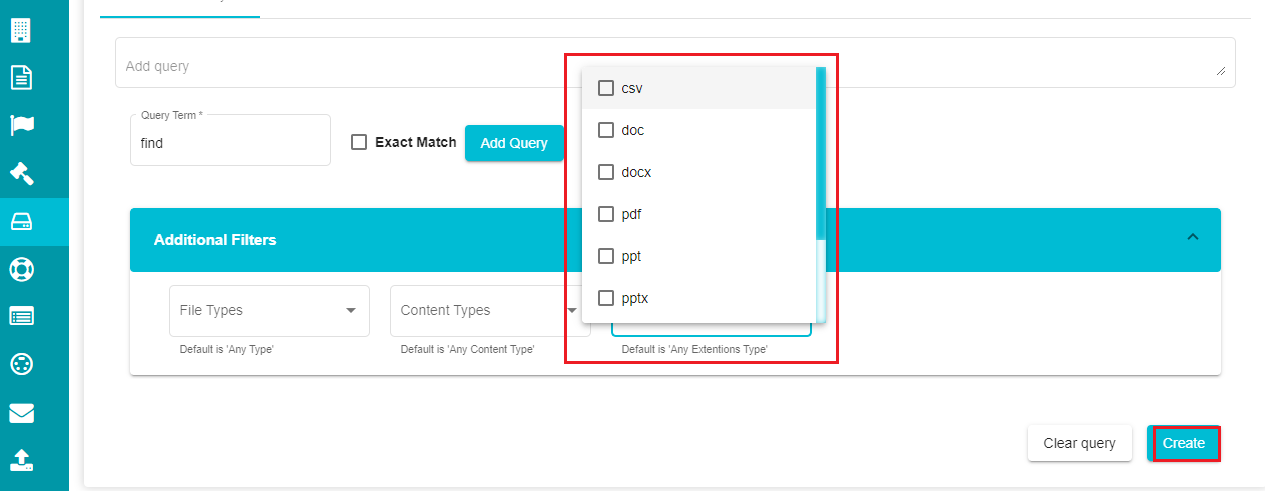
- Use the 'Clear Query' if you want to clear the query that you've created.
Note: Clicking on Create takes you back to the Defensible Deletion homepage, where you can see all the plans.
The plan becomes active as soon as it is defined, the search is performed based on the configurations and the results are displayed when the action is complete.
If you want to alter anything in the search plan after defining it,
Go to the Defensible Deletion homepage.
Navigate to the search plan that you want to edit.
Click on the required plan to see the details.
The screen provides an 'Edit' option below the plan details.
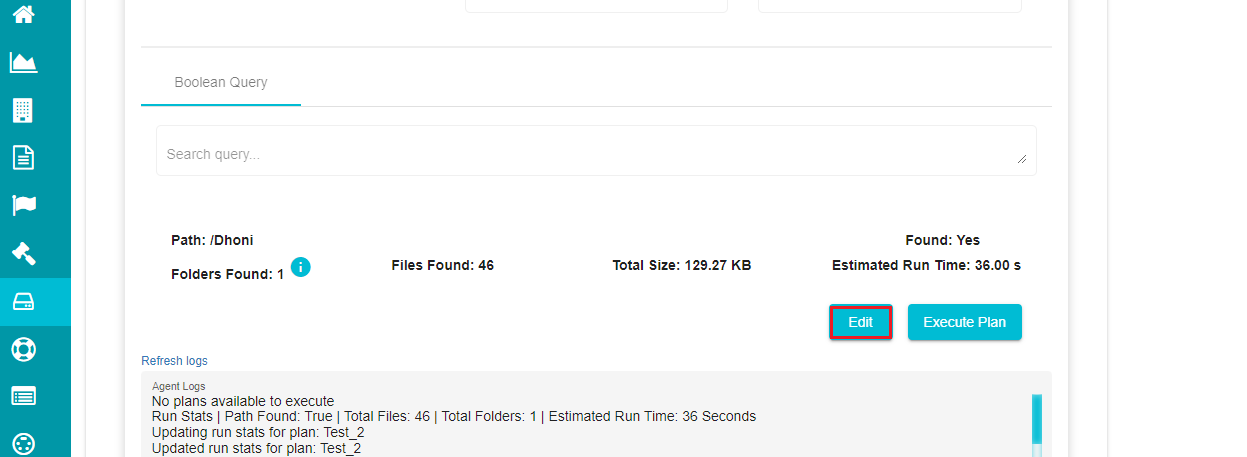
- Click on 'Edit' and make the necessary changes to the plan.
Note: Use the 'Execute Plan' option on the screen if you want to execute the current plan immediately.
For viewing the results,
- Navigate to the 'Complete' tab on the Defensible Deletion dashboard.
You can find all the completed search plans on the screen.
Note: if the files aren't uploaded completely into the BOX sub-systems, the results can be hampered. Moreover, the files need at least 10 minutes to be available for the Agent to access them. In case of unknown files, it might take more than 10 minutes. The results aren't accurate in this case too.
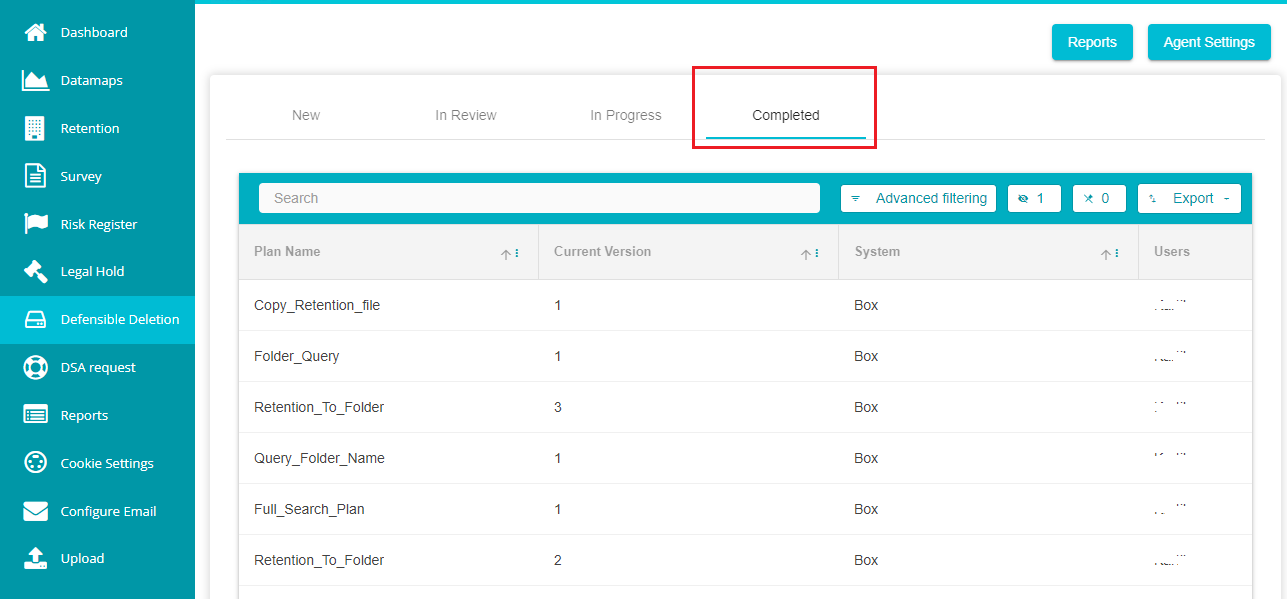
- Click on any of the plans to view its results.
The following stats are displayed once the results are ready.

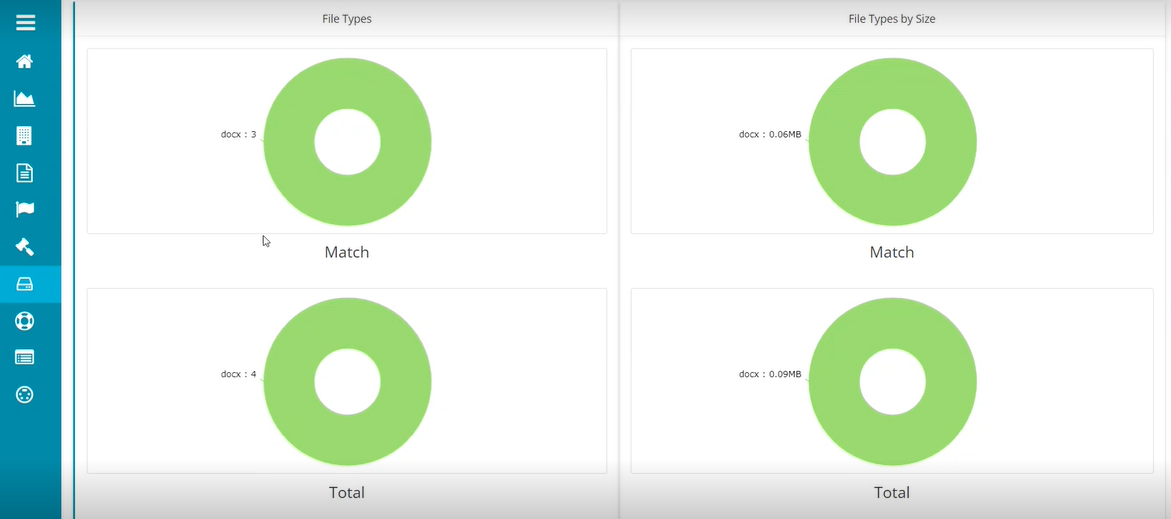
- Clicking on any of the graph or files on this screen displays the following screen showing all the files relevant to the selection.
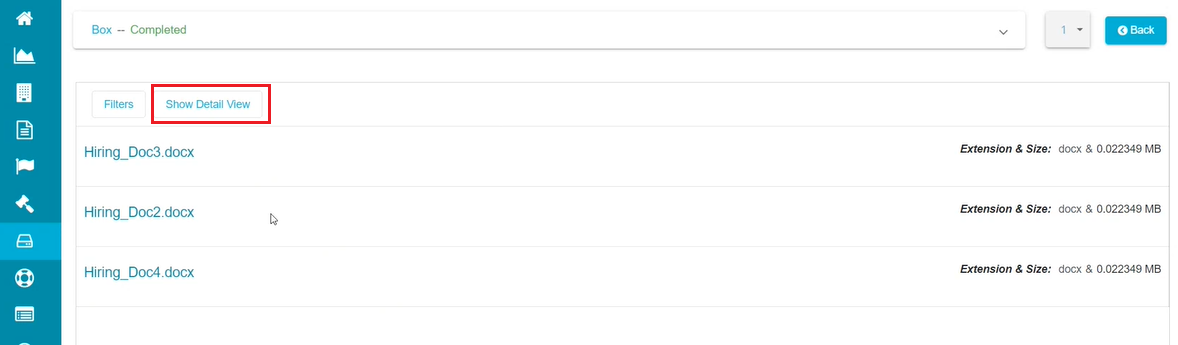
- Click on 'Show Detail View' to see the following screen displaying the details related to the displayed files.
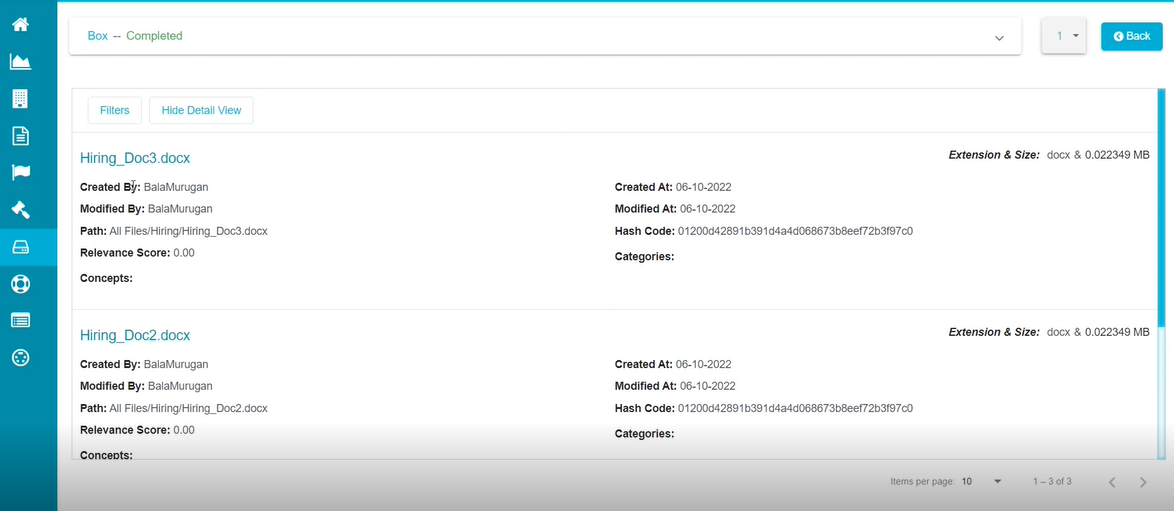
Note: Filters option can be used to apply some relevant filters to the results.
- Click on 'Filters' option.
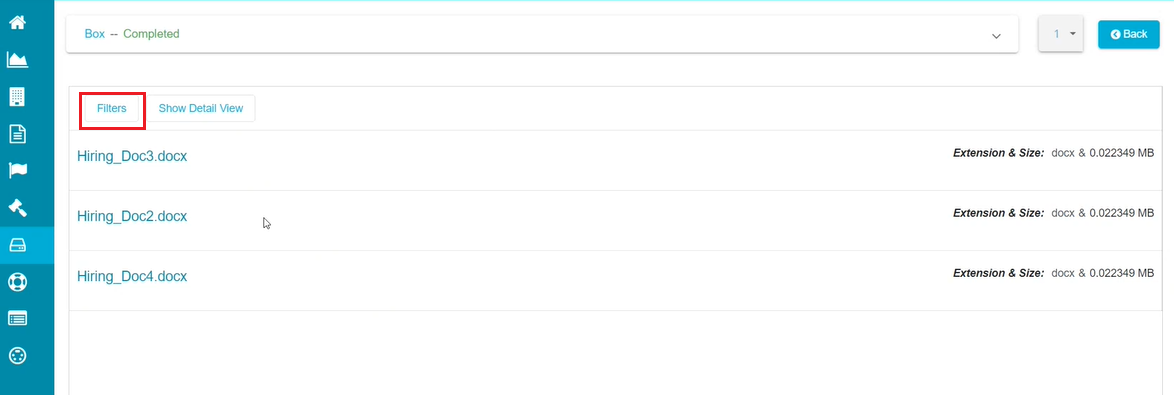
The selection displays a pop-up screen to add filters to the files.
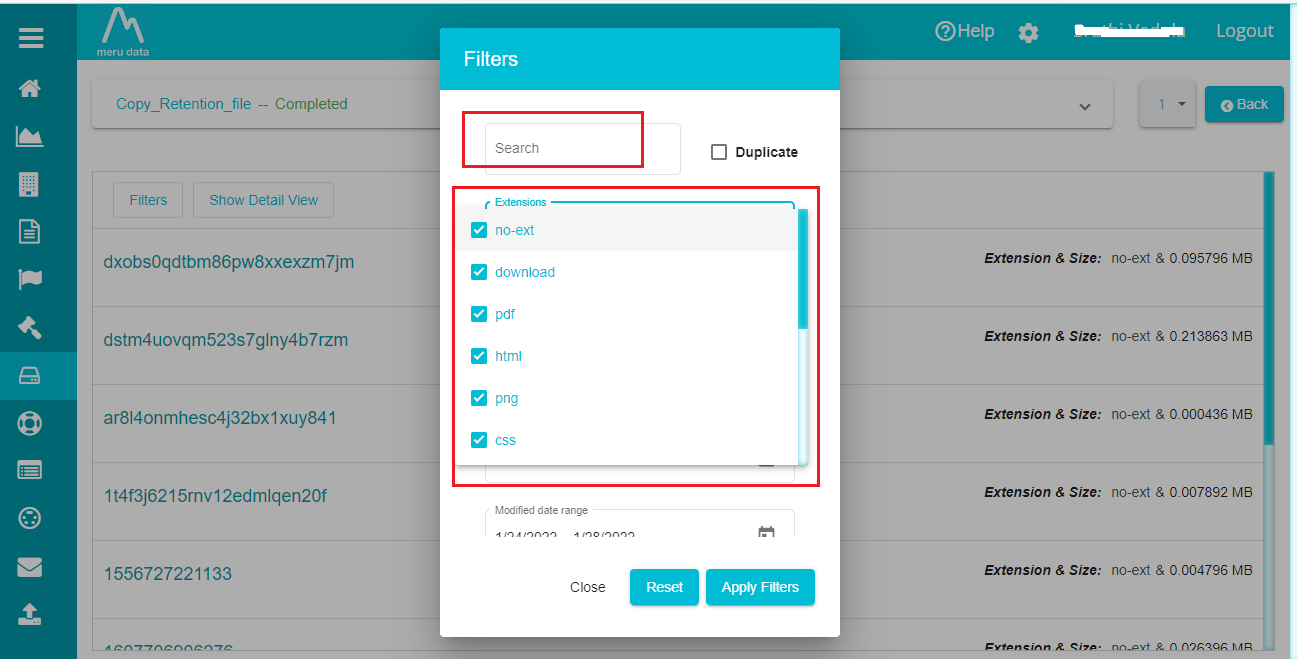
Enter the relevant input in the 'Search' bar.
Select the required 'Extension'.
Define the 'Minimum Size' of the files.
Open the Unit drop-down menu and select the required unit for the Minimum Size of the files.
Likewise, define 'Maximum Size' of the files.
Select the required file size unit from the Unit drop-down menu.
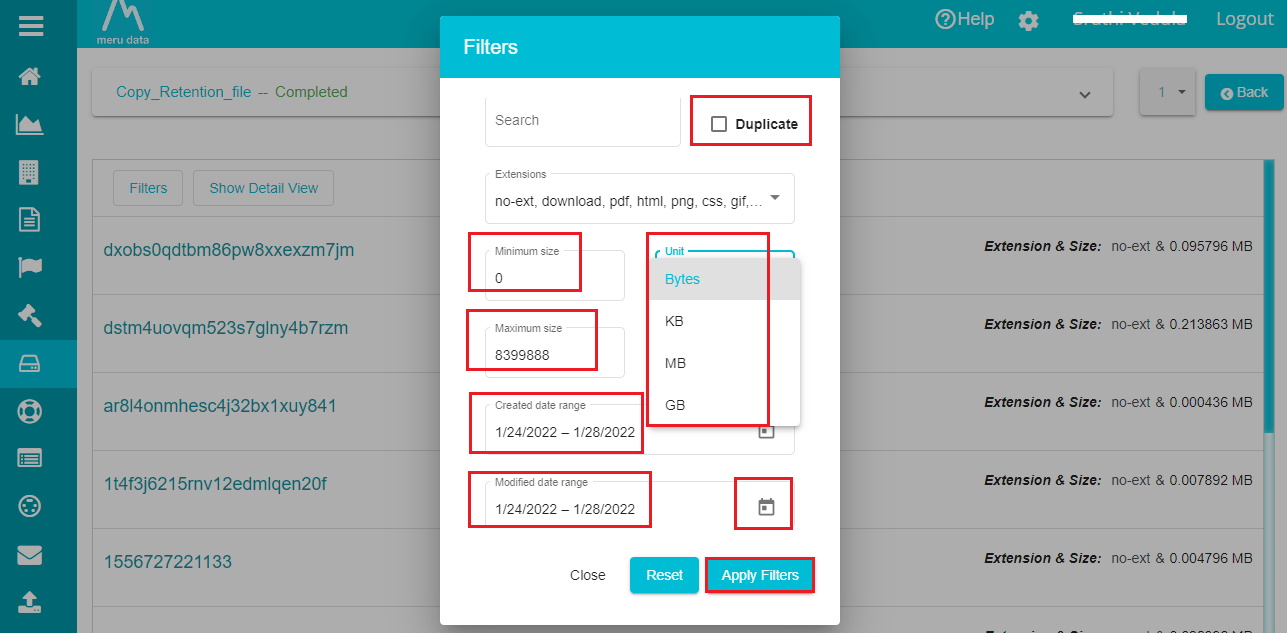
Click on the 'Created data range' and select the appropriate date.
Now, click on the 'Modified date range' and choose the appropriate date.
Note: You can use the Calendar icon next to the Created date range and Modified date range dialog boxes to choose the appropriate date range.
- Click on 'Apply Filters' to save the changes.
Note: Check the Duplicate option active if you want to see the files that are a duplicate of the files matching the applied filters.
Note: Use the 'Close' option if you don't want to apply any filters to these files.
Use the
 option to reset the inputs on the
screen.
option to reset the inputs on the
screen.Click on 'Hide Detail View' option to go back to the results screen.
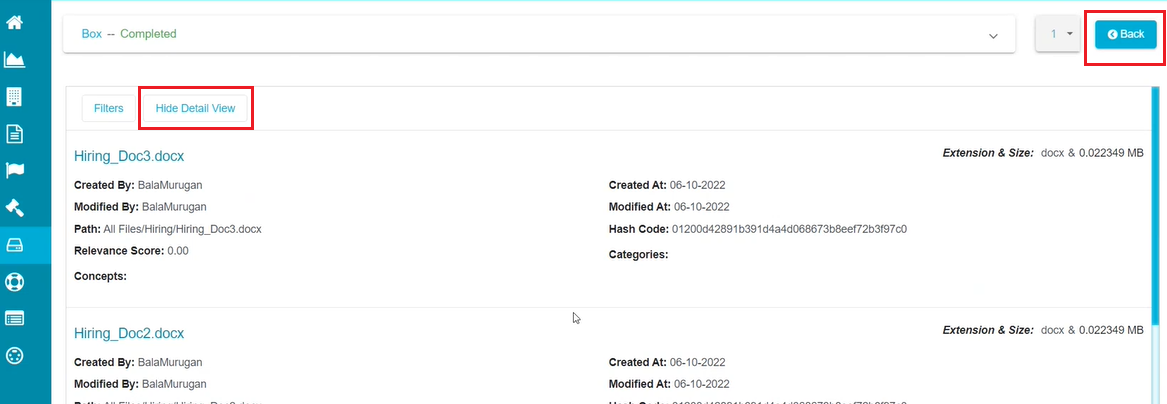
Note: You can also use the 'Back' option to return to the results screen.
Reports
The Reports section shows all the reports of the retentions applied to the folders/files. To access this section,
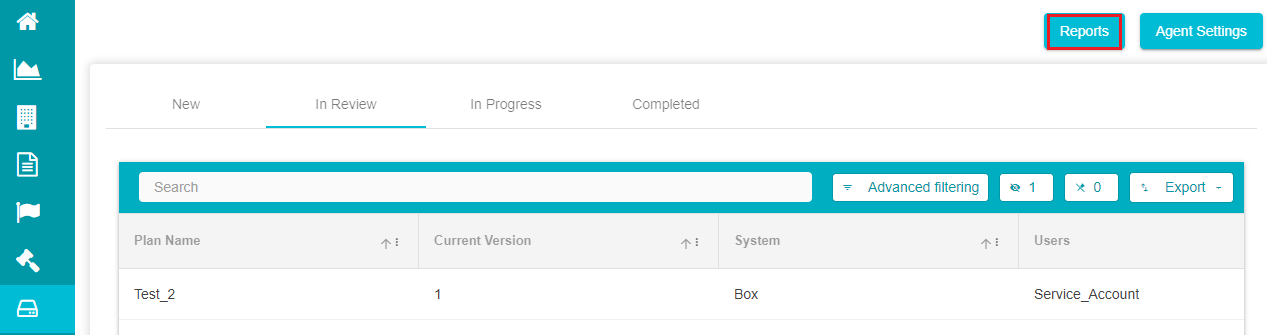
- Click on 'Reports' on the Defensible Deletion home page.
The selection takes you to the following screen where you can see all the Retention Reports.
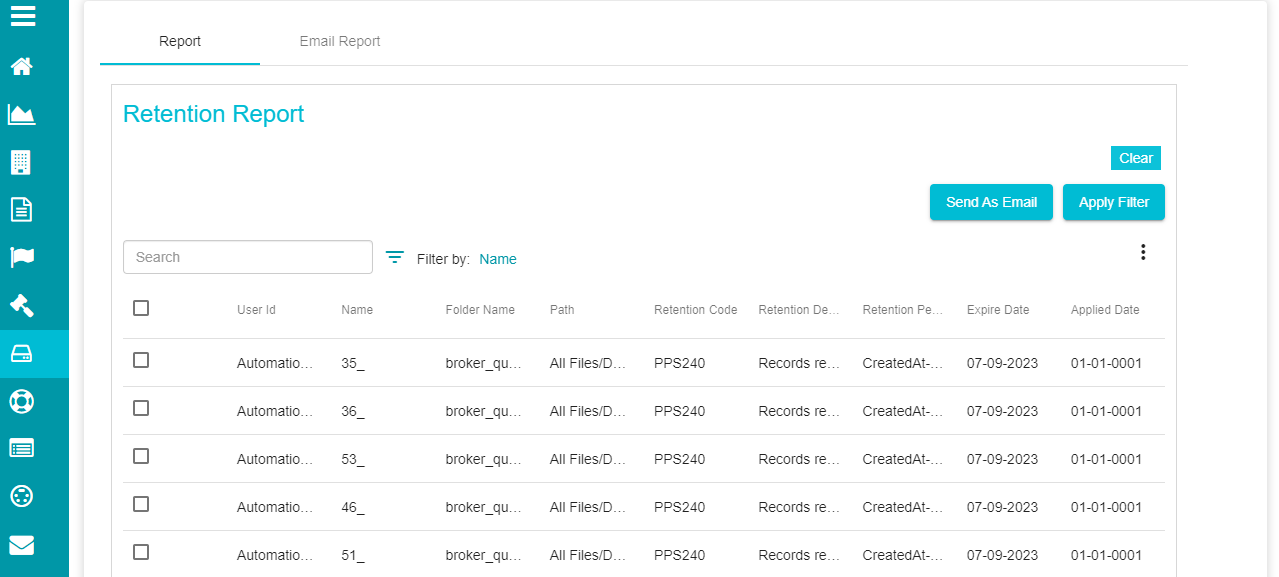
Use the 'Search' bar if you want to search for/ view the results of specific files or folders.
Check the box below the Search bar if you want to select the entire reports displayed on the screen.
Note: this option only selects the reports displayed on the screen and not the entire reports.
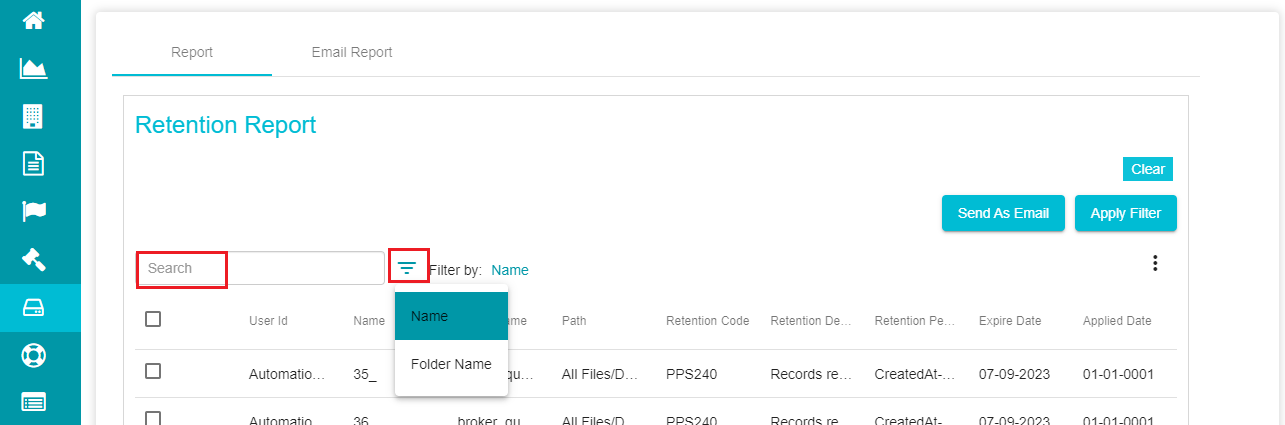
You can also use the 'Filter' icon to filter the displayed reports based on the file name or folder name.
The three dots towards the right provides three options that can be applied to the reports.
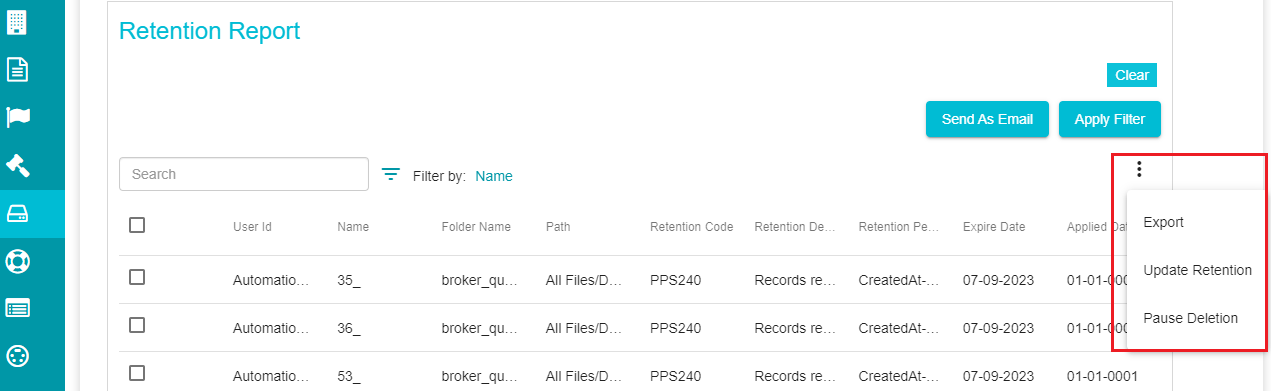
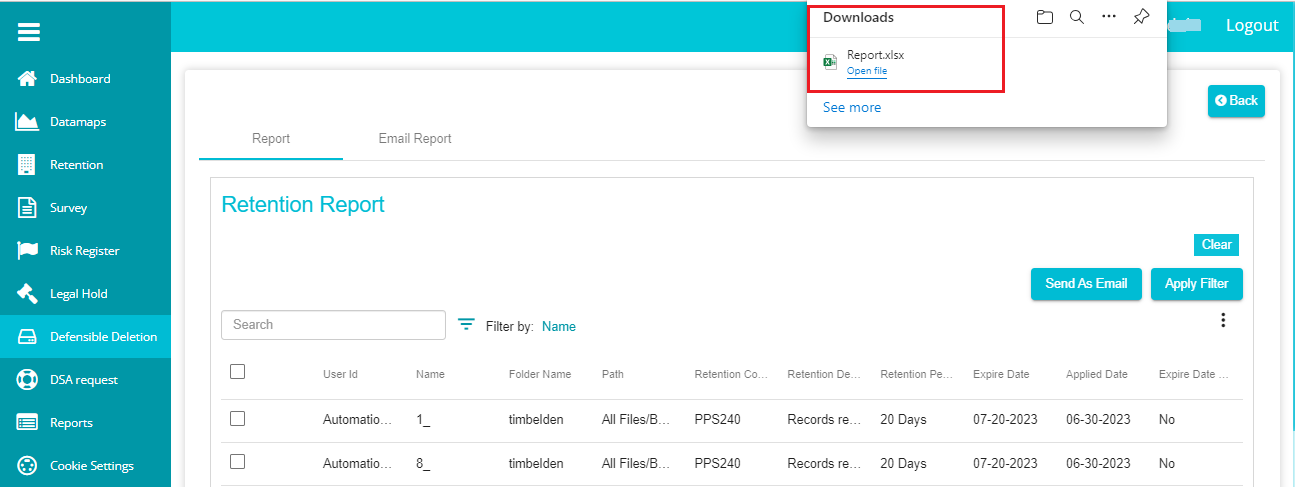
Export -- clicking on this option downloads an excel file with all the information related to the reports into your system.
Note: Update Retention and Pause Deletion options only work for selected files. So, you need to select the files before using any of these options.
Update Retention -- you can use this option to update the retentions of the selected files.
- Click on 'Update Retention' after selecting the required files.
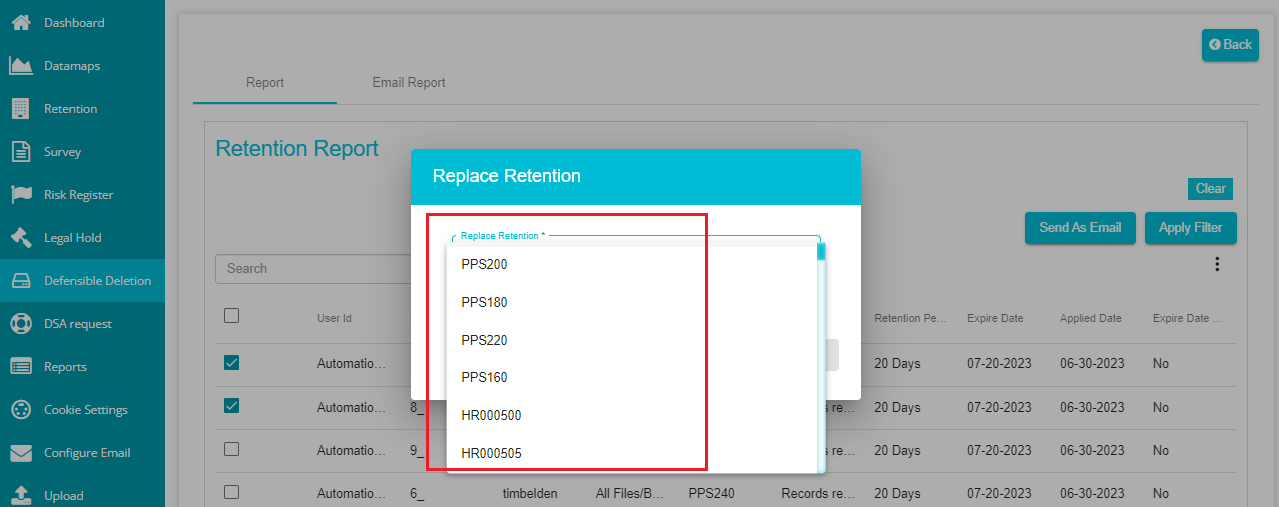
You can see the Replace Retention dialog box popping up on the screen.
Select the required retention from the Replace Retention drop-down menu.
Click on
 to update the retentions of the
selected files.
to update the retentions of the
selected files.
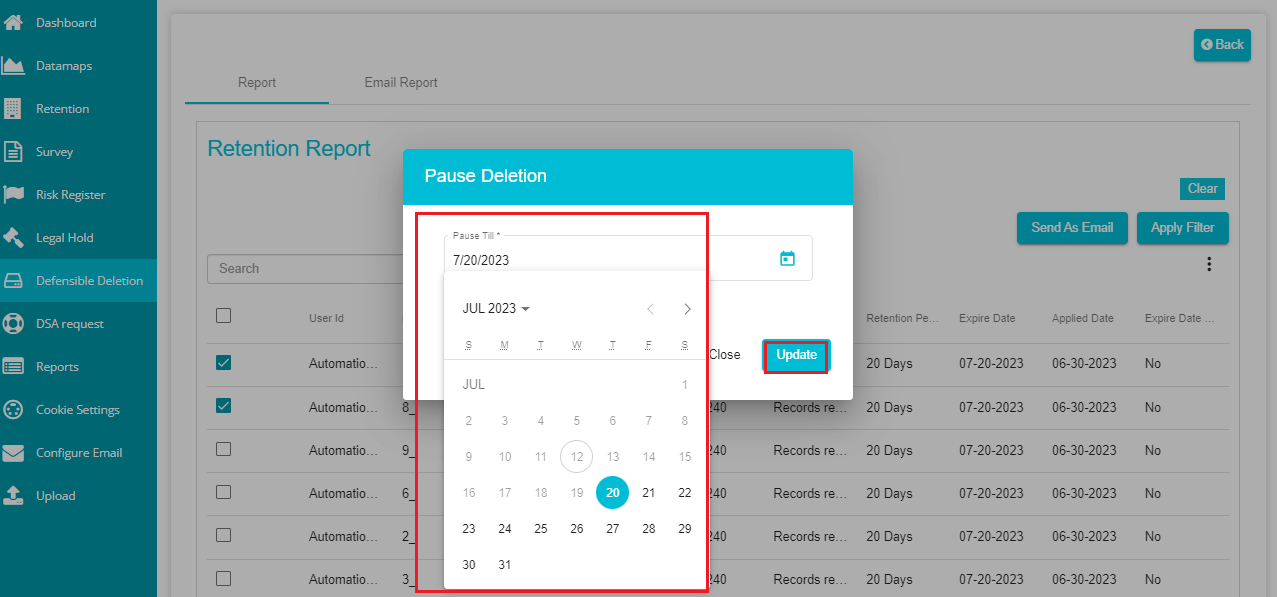
Pause Deletion -- this option can be used to pause the deletion of the selected files until a specific date.
Click on 'Pause Deletion' option.
Select the required date from the calendar.
Click on 'Update' to make the changes.
- Click on Apply Filters to apply different filters to the displayed reports.
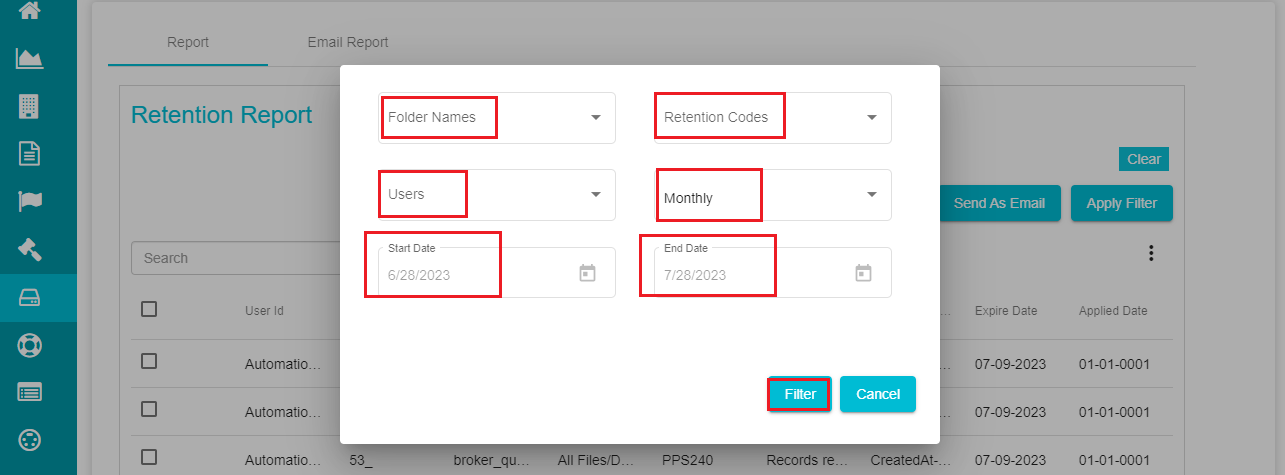
Folder Names -- this drop-down menu displays all the available folders
Retention Codes -- this drop-down menu displays all the available retention codes
Users -- this menu shows all the available users
Duration -- this drop-down menu provides three options -- monthly, quarterly, and custom
Start & End Dates -- shows the start and dates of the reports.
Note: by default, the start and end dates are taken as the current dates. You can change them at requirement.
- Click on Filter to see the reports based on the applied filters.
Note: use the Clear option if you want to clear the filters applied to the reports.
- Click on the 'Send As Email' option if you want to email the reports.
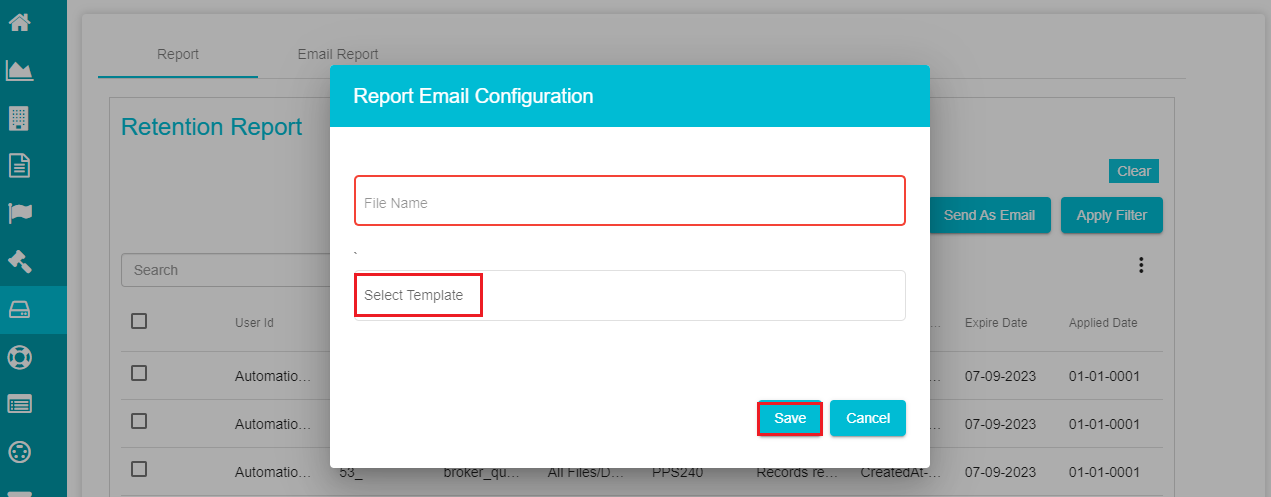
Enter the file name to be emailed.
Open the 'Select Template' drop-down menu and select the required template.
Click on 'Save'.
Note: you need to configure the email address of a user before using this option in case you want to email the reports. For that,
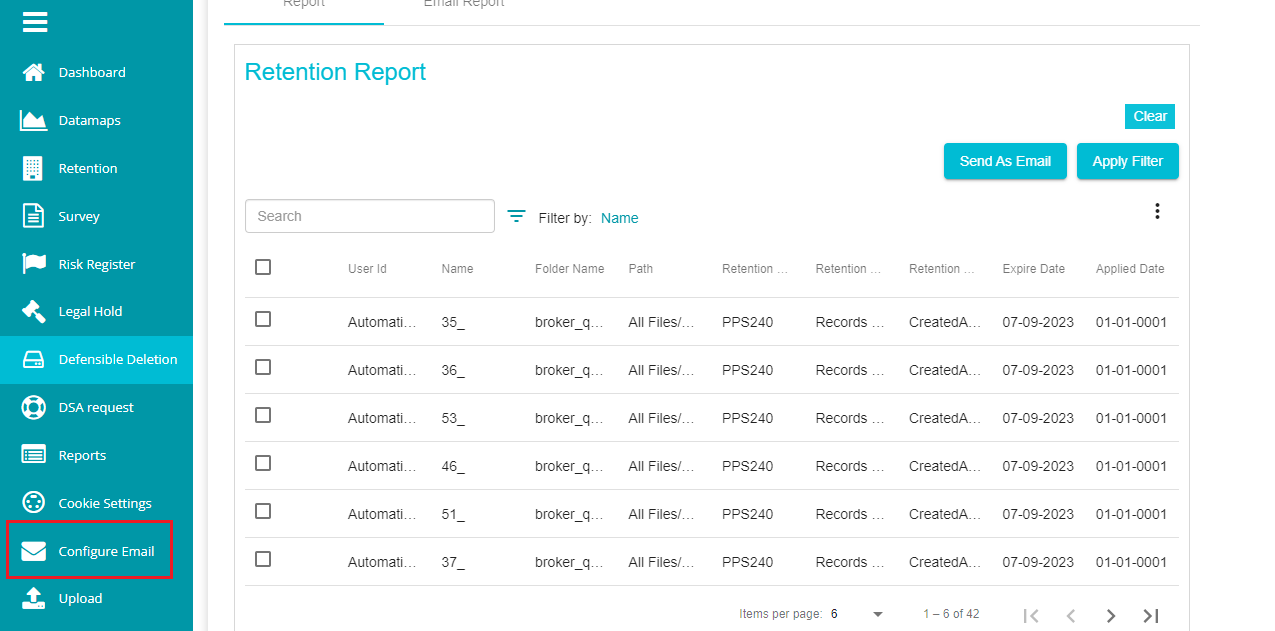
Click on
icon to open the menu.Click on 'Configure Email' option from the menu.
Click on the
icon present on the screen.
This selection shows the following screen where you can configure an email of the user you want to send the reports to at a particular frequency.
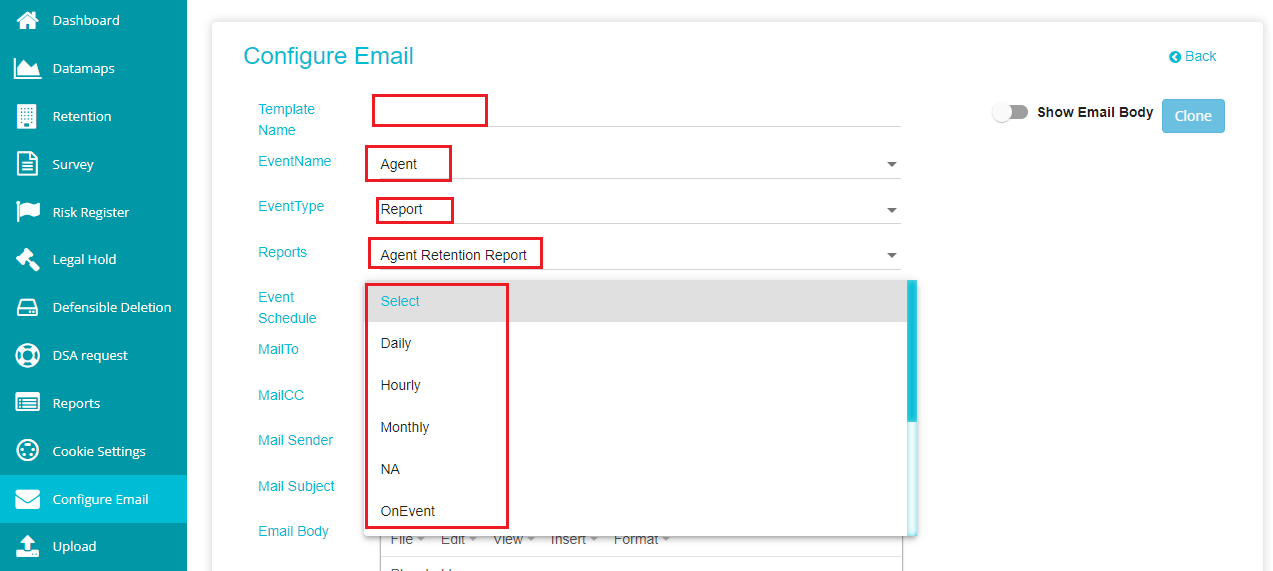
Give the Template Name that you want to define.
Choose the event name, event type, and reports as shown above.
Note: the email configuration works only for this combination and required that you select these specific combinations.
Select the Event Schedule based on the frequency at which you want the emails to be sent.
Enter the email address of the user in 'Mail To'.
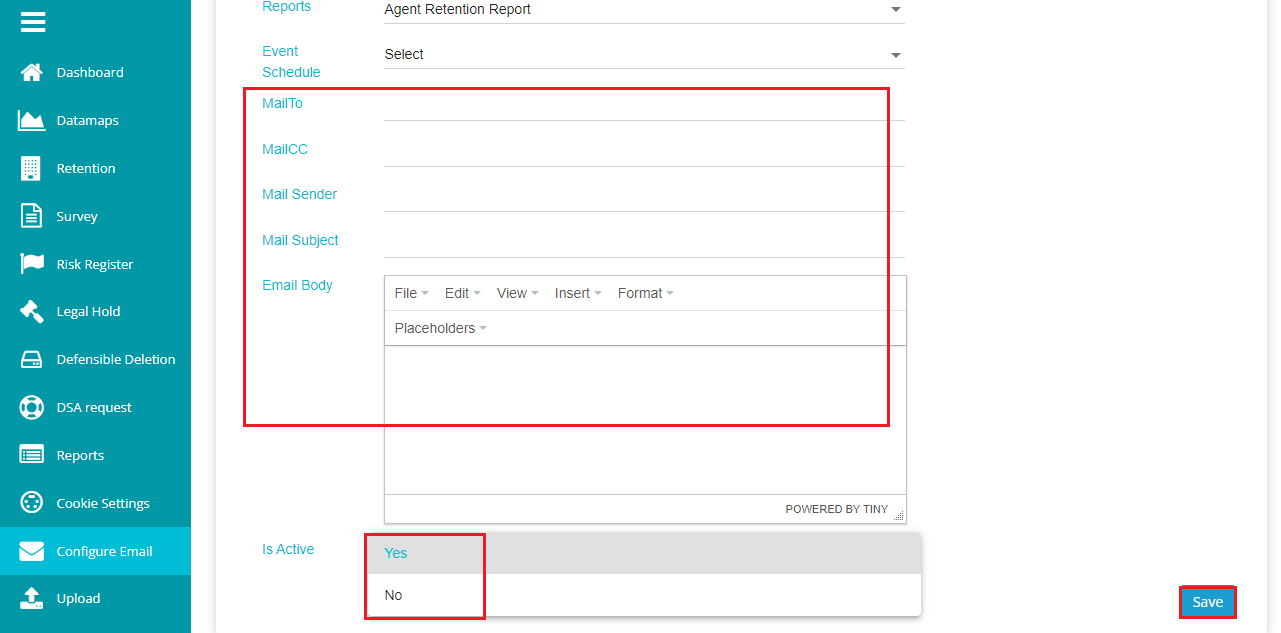
Similarly, enter the email address of the user if you want to add as Mail CC.
Add the Mail Sender email address.
Enter the Mail Subject.
Configure the Email Body as you want the email to be.
Open the Is Active drop-down and select Yes.
Click on Save after entering all the necessary details.
Note: after configuring the email, you can now select the Send As Email option on the Reports screen to email the reports to the configured user.
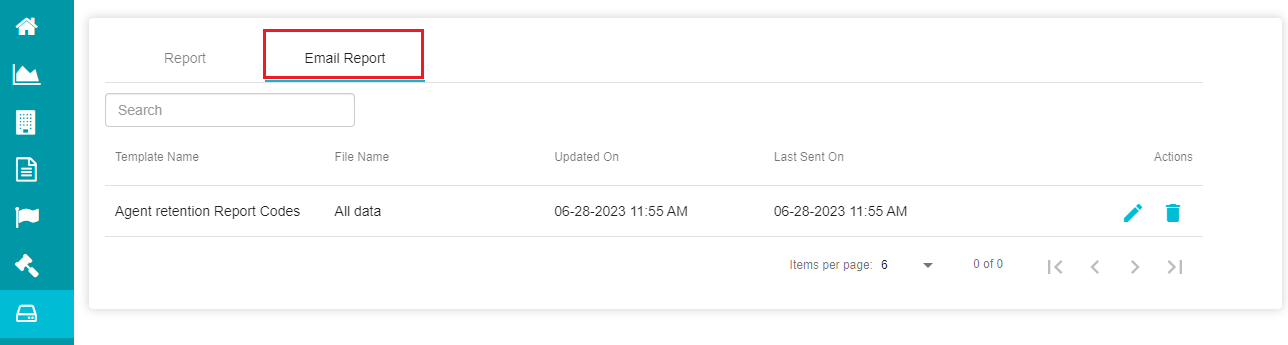
- The Email Report screen shows the reports of the emails sent to the configured users.
Another tab on the Reports screen is the Monitor Retention Settings, which is used to monitor the search plan created initially, to monitor the retention files.
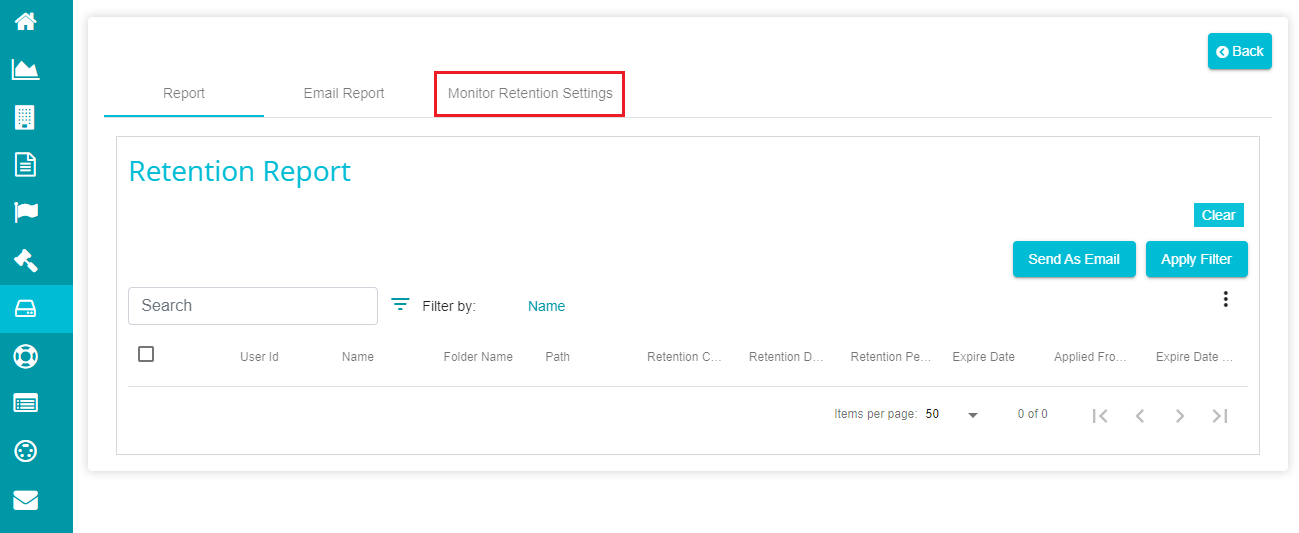
This screen lets you set specific intervals for executing the monitor retention plan which is automatically created when creating the agent.
Note: use the 'Back' option if you don't want to make any changes on this screen.
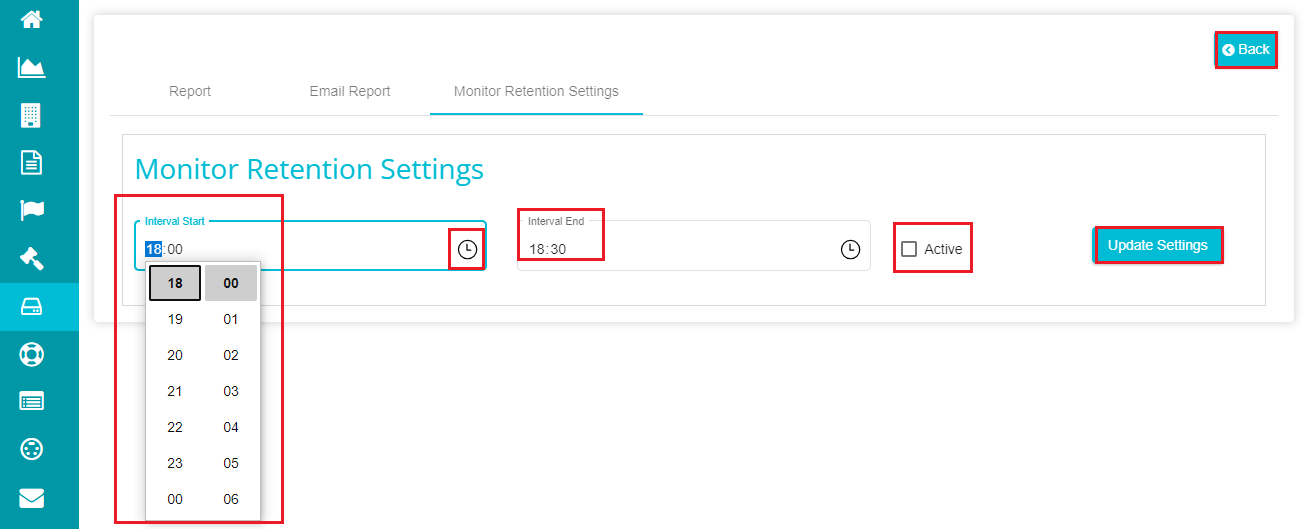
Click on the 'Interval Start' option.
Enter the starting time for running the plan.
Note: you can also click on the clock icon and select the required time from the drop-down menu.
Define the time for ending the plan's execution likewise using the 'Interval End' option.
Mark the 'Active' option after defining the start and end intervals.
Click on 'Update Settings' to make the changes.